Forum Userbar – Learn to Animate it
Part 1: Normal Userbar
This is the userbar I will teach you to make:

Basic Understanding: Userbars
Userbars are small rectangular images that are designed to be put in internet forum signatures. Userbars may be animated based on the designer’s will. They are often used to show the user’s interests, hobbies, or graphical skills.
Things You Need:
-Adobe Photoshop
-Personal Interests
-Some graphical skill
Step 1- Your Userbar:
If you already know what you want to do your userbar on, you can move on to the next step. If you’ve come here to also learn what userbar you would like to make, then read on. Pick a userbar that you think will reflect your personal interests, hobbies, favorites, or just to show off your skills. The one I will be showing you to make is a simple but clean userbar. So if you’re ready, let’s begin!
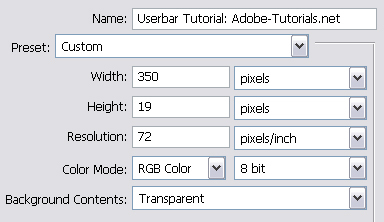
New Document:
Start off by opening a new document with the dimensions 350 x 19 and a transparent background (See Figure Below).
Gradient Effect:
Now that you have your 350 x 19 box, let’s add a gradient. I added a Black > Dark Grey gradient. (See Figure Below). Very simple so far? Good.

Glossy Effect:
In a New Layer we’re going to add a glossy effect at the top using the ‘Elliptical Marquee Tool’ (located as the first tool in the toolbox). Make a selection at the top of the userbar and fill it in with white. Bring down the opacity of that to about 20% for best results. Here is my end result of that step:

Scanlines Effect:
Looks good eh? Now let’s add those famous scanlines. We have to open a new document with the dimensions of 6 x 6 px. Zoom in all the way (1600 %). Get out the Pencil Tool and make 6 boxes (color of your choice) going down diagonally from the top right > bottom left. You should have something like this:
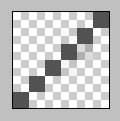
Now that you have that all set go to Edit > Define Pattern > OK. This makes it a pattern for later use. Now minimize that box and go back to your userbar. Double-click on the Background Layer (containing the gradient). Make sure the Layer Style box comes up. Now go to Pattern Overlay (on the left) and make sure it’s check-marked. Make sure you’re in Pattern Overlay and go to Pattern and click the little arrow. Find your pattern that you just made and double-click it. Once you’ve done that lower the opacity of that pattern, for best results. Press OK. You should have something like this now:

Final Step:
Now that is the base of our userbar. Let’s add some text and a logo or a picture. Here’s what I came up with as my result:

The stars are custom shapes and the font is called “Visitor” at size “13“. Save it as a JPEG so you can put it on the net and save it as a PSD for the next step (Animation).
Part 2: Animated Userbar
This is the 2nd part to the Easy Userbar Tutorial where I will show you how to animate the userbar I previously made in part 1. Let’s get started…
Begin The Animation:
Let’s get straight to the point, no messing around. First open up the previous PSD of the userbar we made in part 1. Then go to the top of Photoshop and click (Window > Animation). A long and narrow box labeled Animation will come up. Now I’m going to show you how to animate the text so it transitionns from one text to another. In that same PSD file make a new text layer with what you want. Now go to the Animation Window and click the ‘Duplicate Selected Frames‘ button. Now you should have two frames. In the first frame have exactly what you want to show first. In the second frame have what you want the first frame to transition into. Here’s a screenshot of what we’ve done so far:
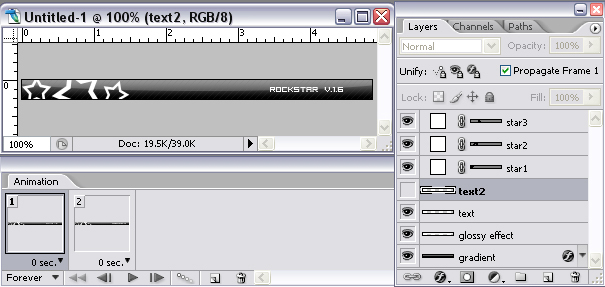
The image above shows my userbar, Animation Window, and the Layers Palette. Now as you can see I have 2 frames in the Animation Window, and so should you. To transition from the first frame to the next click the ‘Tweens Animation Frames‘ Button (3rd button from right). Now a dialog box will come up so use the settings below:
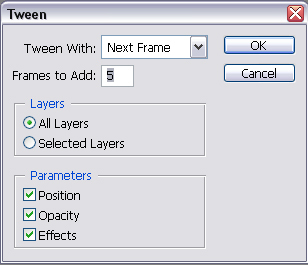
Now in your Animation Window you should have a total of 7 frames. You can change the Time Delay for each slice to make it how you want. I used 1 second for the first and last slide and used 0 seconds for the middle frames. To save this for the web go to (File > Save for Web > Save). Now you can upload it to your site! This is the end result of my animated userbar:
