Aerial City Perspective
In this tutorial you will learn how to recreate a city from an aerial perspective view. Below is a preview of the result.

First let me start by saying that I am a fairly lazy person, and I like shortcuts. So for this tutorial, im going to explain how to recreate one quadrant of the example, and then copy and rotate the original one to make a full intersection.


This is what we will be making as our original.
So create a New document 350×350 px.
Create another new document 42×350. This document will be used to make the road. So fill it with the color that you want your pavement to be. I used grey #999999 for my road. Press CTRL+A to select all. Then CTRL+C to copy selection. Go back to your first 350×350 doc and press CTRL+P to paste your selection. Position your newly pasted layer on the right side. Now duplicate this road layer, and do EDIT>TRANSFORM>ROTATE 90 degrees CW. Position this second road layer at the bottom.

Create a new document 23×23 px. This is going to be used to make your sidewalk pieces. If you don’t want square sidewalk tiles, for example rectangle or diamond shape, go ahead and try it. Be creative. But for learning sake, I will keep mine simple. So back to the new document. Fill this document with the color that you want your sidewalk to be. I chose grey #595959. Select all, copy, and then paste into the primary document (350×350 one).
Now go to your layer styles, and apply bevel and emboss to your square with these settings:

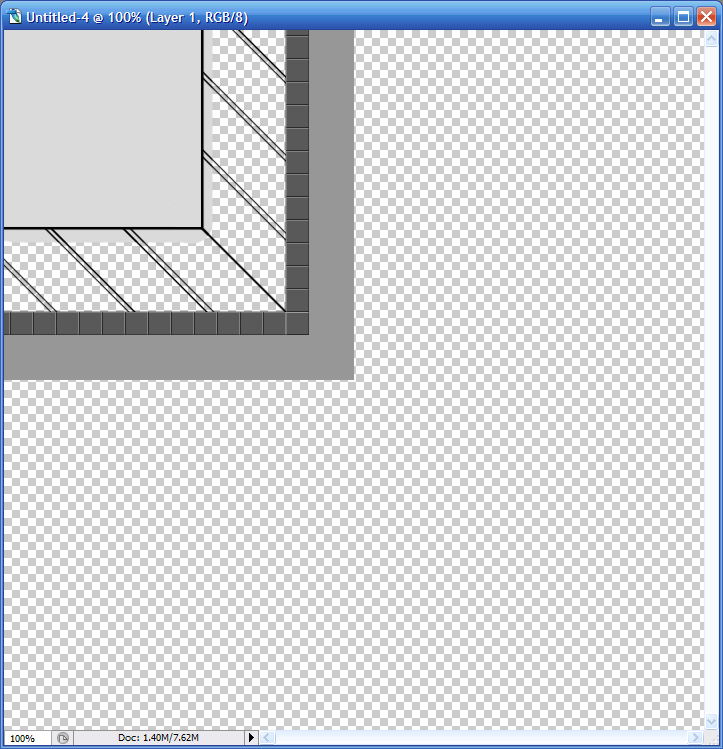
Create a new layer UNDER your square. Position this first square in the corner where the road is.

Duplicate your square and position it on top of the first square. Repeat until you reach the top. Keep duplicating and positioning until you finish the sidewalk. Create a new group and call it sidewalk, and put all your small squares into this group to keep your layers organized.

Create a new layer UNDER all your road layers. It wouldn’t be a bad idea to create a new group for your road layers and just put them all in there since we won’t be using them for a while. Make the 45 degree angle on one layer, then create a new layer and create the two other lines.
Make these lines for the outline of the building:

Hold shift while drawing the lines to make them perfectly horizontal/vertical/45. The 45 degree angle will be the height of the building. So if you want tall buildings, make this line longer. If you want shorter buildings make this line shorter.
Erase the top left portion of the 45 degree angle:

Create a new layer UNDER the two line layers you just made. Now we will add our windows. Create a new document that is as tall as the side of your building, but about twice as long. It wont have to be precise, but the closer the better so you wont have to resize a lot and lose quality.

Don’t forget to include the top and bottom lines.
Select all (CTRL+A) and do EDIT>COPY MERGED.
Paste into your primary document. Do EDIT>TRANSFORM>DISTORT. 
Change this value to 45 degrees and apply.
Now be aware that this method of distortion doesn’t display the perspective properly. But it’s a fine replacement.
Now duplicate the window layer (CTRL+J) and do EDIT>FLIP HORIZONTAL, EDIT ROTATE 90 degrees. It doesn’t matter which way you rotate 90 degrees.
An alternate method is to use EDIT>TRANSFORM>PERSPECTIVE instead of DISTORT. This was the closest I could get my own windows:

Create a new layer UNDER your lines and windows. This will be the color for the roof. I used grey #DCDCDC.

You don’t have to spend time to stay inside the lines because it wont matter later when it is covered up.
Create a new layer ABOVE the rooftop layer, but still under the lines/windows. Now when your coloring the two sides, you might want to take into consideration shadow and lighting. If you refer back to my finished example, you can see that I the sides are not all the same color. But the sides that face the same direction are the same color. The colors I used were:
Light grey; #C8C5C5
Medium grey; #8F8F8F
Dark grey; #535353
Before you start filling in the color of the sides, create a new group, and dump all your layers into that group. Your layers panel should now look like this:

Its time to start putting together the final document. So create a new document 2 times bigger than your primary one. In this tutorial, my primary document was 350×350, so my final would be 700×700.
From your primary doc, click and drag your group1 into your final doc and position it in the top left corner:
Now duplicate your group, and flip it horizontally EDIT>TRANFORM>FLIP HORIZONTALLY. Position it in the top right corner. Duplicate the group you just flipped, but flip it vertically this time EDIT>TRANSFORM>FLIP VERTICALLY. Position this one in the bottom right. Duplicate, and flip horizontal and position in the bottom left corner.

Next up is the meridian lines and crosswalks.
Start with the crosswalks. Create a new layer and make a box filled with white and about as big as 2 blocks (if you used blocks on your sidewalk).
Now using your polygon lasso tool with add to selection mode, select diagonals like so:

Duplicate and rotate as necessary:

I have also added a black outline to mine.
Now for the middle lines. Create a new layer. I used yellow #FFD800 for my lines. Get your pencil tool, and set the size to 1 px. To find the middle, you can use the diagonals. With the shape line tool, make a path from each of the corners creating the diagonals. And where the two diagonals cross is the center. So start another path from the middle, hold shift, and drag up to get the middle line. Then to delete the path when your done, click on the PATHS tab next to layers and channels tabs.
Use your 1px pencil with yellow while holding shift and drag down from the top to the crosswalk.
Now there is a few ways to make the broken line. What I like to do is make a new document (1×16 for this occasion) then fill with yellow, copy and past, then go back to the 1×16 and fill it with black and copy and paste. The black bar will be used as a spacer, and then I will duplicate the yellow bars until I reach the end.

In the above image, you can see how I used the spacer to equally space out the yellow bars.
Now just merge all your yellow bars and lines together (don’t merge the black spacer in with it), duplicate and rotate 90 degrees, position, and repeat.
And there you have it; an aerial view of a city intersection. Next you can add some cars, some people, more advanced shadows, whatever you can think of!