Old Map Tutorial

Here’s a great way of taking a simple black and white drawing and converting it into a mysterious, old map, lost for hundreds of years. For the ingredients you need to look on the net for a nice, black and white drawing or diagram. I found this on Google.

Step 1

Only choose big images. This one was 1000×1420. Open it in Photoshop.


Read the rest of this entry »

Gothic Makeover in Photoshop

Do you remember when Killing Joke sang ‘eighties, I’m living in the eighties’? No, probably not. Only if you are as old as I am. Being a Goth in England in the 80s was a great time. All that hair. Black hair. And piercings before they were a fashion a accessory. Anyhow, those days are long gone (as you will see in the image in step 1), but I think it’s time to bring them back, albeit digitally. So when you’re ready, let’s start the Gothic makeover.

Step 1

CRTL+O to open your photo in P’shop. If you take a shot specifically for this, make sure it’s at a high resolution and you don’t cut the head off.


Read the rest of this entry »

Create a Fun Underwater Scene in Photoshop

One of the great, fun aspects of Photoshop is being able to create your own photos from elements of other pictures. In this new tutorial, I’m going to be making an underwater scene.

Step 1

The most important part of any photo montage or ‘chop’ is finding good sources. There are many stock photo sites out there and lots are free. But the best way to get good source images is to take out your camera and shoot them yourself. Unfortunately, in this tutorial I have no intention of getting my camera wet, so these will have to do. The first job (and probably the most boring) is to cut out the images you are going to use. There are different ways of doing this depending on the needs of your photo. Here, I’m going to be using the pen tool, as there are lots of angular lines and, more importantly, no hair!

Read the rest of this entry »

Creating Smilies in Photoshop

Creating smilies in Photoshop isn’t as hard as you would think; anyone can make them with just a little knowledge of how to go about it.

Step 1
The first job you need to do is study other smilies. Go to your favorite forum and right click some smilies. Right click them and save to your hard disk. Open up Photoshop and hit SHIFT+CRTL+M to open up Image ready. Open your saved smilie:


Read the rest of this entry »

Turning Yourself into a Werewolf with Photoshop

As it is nearly Halloween again, I think it’s time for a horror Photoshop tutorial. The thing is, there are tons of Zombies, Vampires and other assorted ghoulie tutorials out there, but as yet very few werewolf ones. So here goes, get ready to grow some hair and bark at the moon. By the way, if you are looking for a quick, 5 minute tutorial, keep looking! This is going to take some time, so be prepared.

Step 1

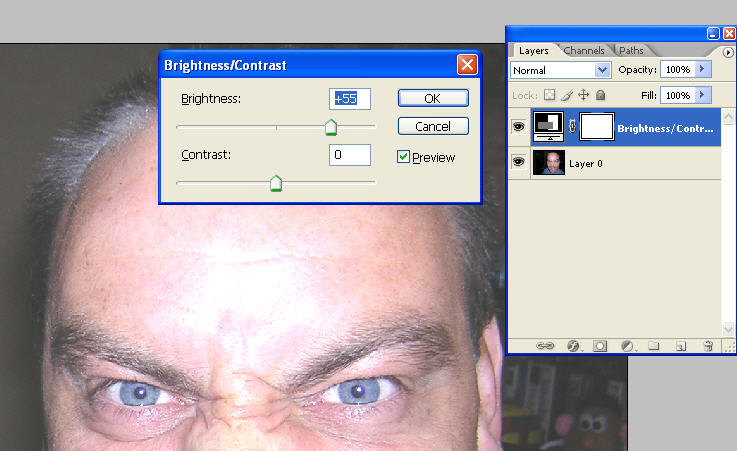
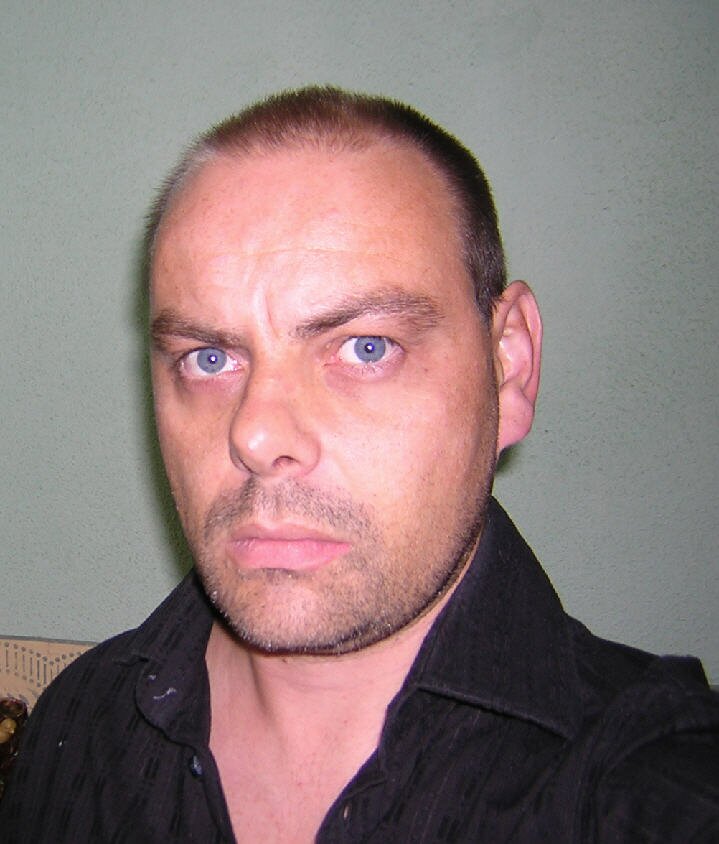
I’ve chosen this good looking, young, blue eyed guy for this tutorial. Ok, I’m old and bald. But not for long. The first job is to cut out the face and body from the background. For this, we’re going to use the dreaded pen tool. Don’t worry though, it’s not as bad as you think it is. First though, we need to lighten the image. I don’t want to make any changes to the image, so we’re going to use an adjustment layer. With this, we can lighten the image and after just delete it. Click the little black and white circle at the bottom of the layers panel, and choose ‘Brightness/contrast’ from the drop and menu. A new screen pops up where we can increase the brightness.


Read the rest of this entry »

Professional Dark Web Button

This tutorial will show you how to make a Professional web button and also to use it like a Navigation Bar.

1. Make a rectangle with the Rectangle Tool (any color) and Rasterize it.

Adobe Photoshop Free Tutorials for the Photoshoplovr inside us!
Read the rest of this entry »

Glossy Web 2.0 Button

Learn how to make a nice Web 2.0 style Glossy Button using Layer Styles, also how to make a rollover.

1. Make a rectangle with the Rounded Rectangle Tool (any color) and right click and Rasterize it.

Photoshop Tutorials. Glossy button.
Read the rest of this entry »

Cool Web 2.0 Badge

Make a good looking Web 2.0 style Badge, in a easy way using the Polygon Tool and some Layer Styles.

1. Create a Badge using the Polygon Tool.

Photoshop Tutorials. Badge 2.0
Read the rest of this entry »

BioShock WebSite Header

Learn how to make a header for your website with a BioShock style

1. Start by opening a new file: 710px * 210px
2. Create a new layer, select the Rectangular Marquee Tool and set a fixed size of 700 * 40px and place your selection at the top of your canvas. Go to Select -> Modify -> Smooth and use 5px radius, now fill your selection with #157272

Adobe Photoshop Tutorials BioShock Header Read the rest of this entry »

Pixel Style Navigation Box

Learn how to make a navigation box with a unique pixel style.

1. Start by making a 210 * 260 px file. Create a new layer, select the Rectangular Marquee Tool, set a fixed size of 200px * 30px and place your selection in your document. Go to Select -> Modify -> Smooth and apply a 3px radius(be sure that your selection isn’t touching any of the borders of your canvas, if it’s touching them tehy will not be ‘smoothed’)
Adobe Photoshop Free Tutorials
Read the rest of this entry »

Creating a Web 2.0 Template Design

Learn the basics on creating a Web 2.0 Template design for your web.

1. Start by opening a new 800 * 900 px file
2. Create a new layer and make a #4dbce9 to Transparent gradient form top to bottom like in the image below
Adobe Photoshop Free Tutorials
Read the rest of this entry »

Make an iPod Classic or the New Nano

You will be learning how to create an iPod classic but also you can use the same technique to make an iPod nano.

1. Start by opening a new file: 300*540 px.

2. Make a rectangle with the Rounded Rectangle Tool, using fixed size: 270*452 px and 25 px for Radius.

Photoshop Tutorials. Make the new iPod classic.
Read the rest of this entry »

Halo 3 Logo

Learn how to create the new Halo 3 Logo!

1. Start by opening a 500px by 150px file.
2. Write “HALO 3“(yes, in uppercase) using the Halo Font in any color.
Halo 3 Photoshop Tutorial
Read the rest of this entry »

Under Water Effect

Learn how to make a realistic under water effect using some Filters and Brushes.

1. Start by opening a new file with 400px by 400px
Photoshop Tutorials.
Read the rest of this entry »

Vista Style Nav Bar

Create a navigation bar with a unique Vista Style

1. Start by opening a new file: 500px * 50px
2. Make a 480px * 30px selection
Photoshop Tutorials Vista Style Nav Bar
Read the rest of this entry »

Bloody Skull

Learn how to make creepy photo effect using Filter Effects and some Brushes.

1. Open this image (I found it at yotophoto but you can use your own) and duplicate it. Now set #000000 as Foreground Color and #b62222 as Background Color then with image duplicated go to Filter/Sketch/Photocopy and change it to the following values:
Read the rest of this entry »

Make Your Own RSS Feed Icon

Learn how to make a classic RSS Feed icon with a unique style.

1. First create a square using the Rounded Rectangle Tool and use the Geometry Options as you can see below. With this we’ll be doing a square with a size of 96px,if you want can use another icon size like: 128px, 64px, 48px, 32px, 24px, 16px, 12px or 10px. If you prefer it can use you own customized size.
Photoshop Tutorials. Fixed size.
Read the rest of this entry »

Clean and Dark Navigation Bar

Learn how to create a simple navigation bar with some dark colors in a few steps. Easy to do.

1. First we have to make a rectangle to do this we are going to select the Rounded Rectangle Tool,it doesn’t matter if the size and shape are a little bit different and also color doesn’t matter. I’m going to use Radius with 5px.

Rectangule options

Read the rest of this entry »

Text on Path

Learn how to make a text follow a path created with the pen tool and other tools.

– Start by opening a new file, size doesn’t matter
– Using the Pen Tool draw a path, it can be in any way
Text on Path Photoshop Tutorials
Read the rest of this entry »

Dreamy Effect

Give your photos a dreamy like effect with some simple filter effects.

– Start by opening up an image in Photoshop, any photo should work. I’m going to use this landscape found in Google
Dreamy Effect Photoshop Tutorials
Read the rest of this entry »