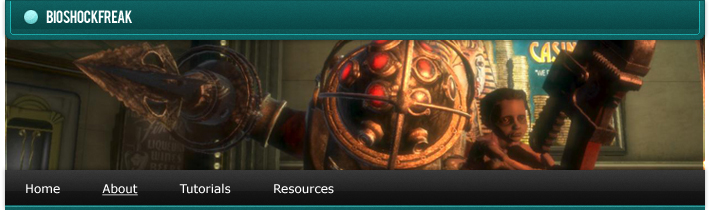
BioShock WebSite Header
Learn how to make a header for your website with a BioShock style
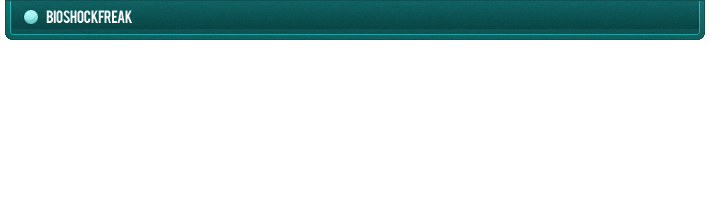
1. Start by opening a new file: 710px * 210px
2. Create a new layer, select the Rectangular Marquee Tool and set a fixed size of 700 * 40px and place your selection at the top of your canvas. Go to Select -> Modify -> Smooth and use 5px radius, now fill your selection with #157272

3. Apply these layer styles
– Gradient: #157272 to #1b8484

– Stroke: #126464

4. Ctrl+Click over the layer thumb, create a new layer and go to Select -> Modify -> Contract and contract it by 5px. Now go to Edit -> Stroke and apply a 1px solid White(#ffffff) stroke

5. Select the Single Row Marquee Tool and place it at the top of your canvas and delete it

6. Change this layer’s blend mode to Overlay and opacity to 55%

7. Using the Rectangular Marquee Tool select the inside part of the stroke you just made

8. Then make a #157272 to Transparent Gradient in a new layer and change this layer’s blend mode to Multiply and Opacity to 60%

9. Repeat Step 7 and move your selection by 5px up, go to Select -> Inverse, create a new layer and make a White to Transparent gradient like in the image below

10. Repeat Step 7 again, go to Select -> Inverse and press Del to clear the excess of White parts. Now change this layer’s blend mode to Soft Light and opacity to 40%

11. Apply some text to it, I’m going to use Bebas at 18pt and White color

12. Create a new layer, make a small circle next to your text with the Elliptical Marquee Tool and fill it with #78d4d4

13. Apply these layer styles
– Drop Shadow: #0d5858

– Gradient: #78d4d4 to #b0ffff

14. Create a new layer, select the Elliptical Marquee Tool and make a circle selection over the top part of your blue circle, now make a White to Transparent gradient over it

15. Ctrl+click over the blue circle layer’s thumb, go to Select -> Inverse and press Del, now change this layer’s blend mode to Soft Light

16. Now we’re going to add a texture, Ctrl+Click over the first layer thumb(the one that has the basic shape) go to Edit -> Copy Merged and then create a new layer and paste it there. Then go to Filter -> Noise -> Add Noise and apply 10% uniform noise to it, change this layer’s blend mode to Multiply and opacity to 30%
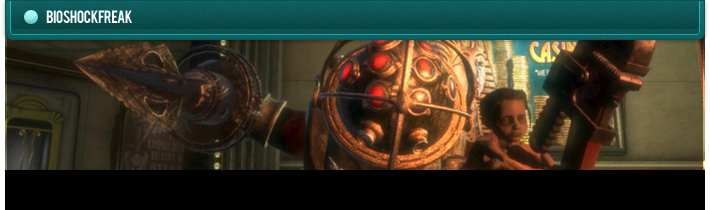
17. Now go and look for an image to use in the header, I’m going to use this one and you can also use it. Place it in your file and move it’s layer to the bottom(under the first layer where the shape is)

18. Select the Rectangular Marquee Tool and set a fixed size of 700px * 210px and place it in the middle of your canvas, go to Select -> Inverse and delete your selection
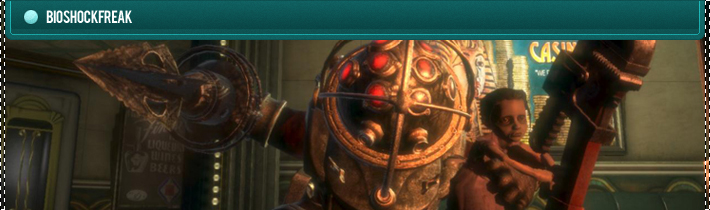
19. Ctrl+Click over the image layer’s thumb, create a new layer and go to Edit -> Stroke and apply a 2px inside White stroke. Change this layer’s blend mode to Overlay
20. Now we’re going to make the Navigation bar at the bottom of the header. Create a new layer and select the Rectangular Marquee Tool with a fixed size of 700px * 40px, place your selection at the bottom and fill it with #oooooo
21. Apply this layer style
– Gradient: #111111 to #2c2c2c

22. Create a new layer, select the Rectangular Marquee Tool and set a fixed size of 700 * 5px, place your selection at the bottom and fill it with #157272

23. Create a new layer, select the Single Row Marquee Tool and make a selection 1px under the top of the last one and fill it with White, then change this layer’s blend mode to Soft Light

24. Ctrl+click over the layer which has the shape on it(the one you created in step 20) and go to Edit -> Copy Merged, then create a new layer and paste it there. Go to Filter -> Noise -> Add Noise and apply 10% uniform noise to it, change this layer’s blend mode to Multiply and opacity to 30%

25. Create a new layer, Ctrl+click over that layer again and go to Select -> Modify -> Contract and contract it by 1px, then go to Edit -> Stroke and apply a 1px White Stroke. Change this layer’s blend mode to Overlay and opacity to 30%

26. Write in your links, I’m going to use Verdana 12pt #ffffff, and it’s finished!