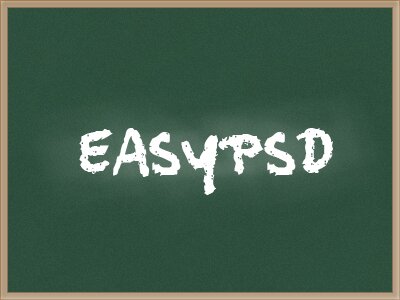
Chalkboard
Step 1:
As you can see above, that is the chalkboard design that I’ll be demonstrating how to create. You will be creating a chalkboard background, realistic board like on most chalkboards now-a-days, and some chalk text. First and for most, create a new document and size it at 400×300 pixels with a transparent background.

Step 2:
Select your paintbucket tool from the toolbox and change your background color to #375646. After that, create a new layer.

Now change the foreground (you’ll see 2 boxes of color, change the one in the back) to #486c59. You should have something like in the above image preview. Now with the 2 colors, go to the top of your Adobe Photoshop window and click Filters > Render > Clouds.

Step 3:
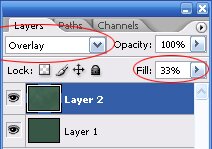
For best results, you might want to go to Filters > Sharpen > Sharpen on the clouds to give them some more edges to them. Now change the layer’s blending mode to “Overlay”. Then lower the opacity to 33%. To change the blending mode and opacity, you must go to the layers box and look on top. Here’s a quick sample. below.
Now you should have something like the preview below.

Step 4:
Create a new layer and fill the background color in with white or black. Now go up to filters again and find Filters > Noise > Add Noise. Change the settings to the following: Amount(177%), Distribution(Uniform), Monochromatic(Yes). Then click ok. Now change the blending mode on that to Overlay and the opacity to 3%.

Step 5:
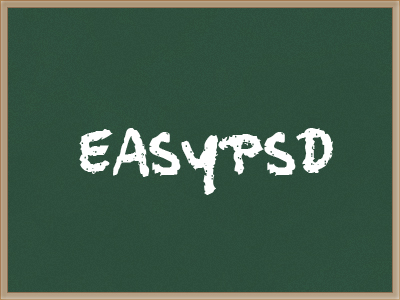
So far so well, you should have something like the above image, but not an exact copy. (varies on the clouds/noise). Now time to make the border. Create another new layer and fill that in with #b5a085.
Go to layer > layer style > blending options. Change the FILL opacity to 0%. Then go to stroke on the bottom left. Change the color to #b5a085 again, change the size to 8px, and then change the position to inside. Now create a new layer above that and take the Marquee Selction tool (top left tool) and zoom in all the way so you can see the pixels of the border.
Look at the sample picture above and select all around the border so you can make a outside border. Now right click somewhere in the selection and go to Stroke. Change the size to 1, color to #8f6f54, location to outside, and the rest default.
Step 6:
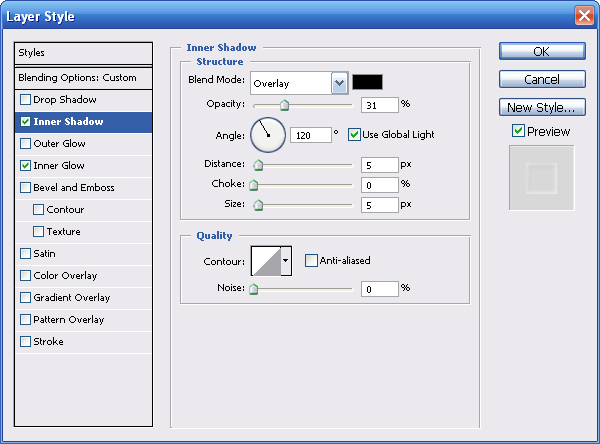
Now to add some depth to the border like all wood outside of the internet. Create a new layer above all the rest and fill it in with white. Go to Layer > Layer Style > Blending options. Change the fill opacity to 0%. The look on the left and change the INNER GLOW and INNER SHADOW options. Use the settings provided below in the links.
Inner Shadow settings
Inner Glow settings
Step 7:
Now it’s time to add some chalk/text. First you need to go to link and download the chalk font. Put it into your fonts folder and open up Adobe Photoshop and find the font. Now write what ever you want on the chalkboard. I suggest changing the size to 48 and AA to sharp.
Step 8:
Now duplicate the text layer and go to Filter > Blur > Motion blur. Change the angle to 69 and distance to 67. Then click ok. Now go back to Filter > Blur > Motion blur but this time change the angle to 13 and distance to 97. Click ok. Now change the opacity of this layer to about 65% and erase some bits and pieces to make it look like a eraser took some off. Now it should look like the picture above “Step 8” text.
Step 9:
Now time to finish this off. Find your brushes tool and change the brush to something soft like 27 and the color to black. Now brush in the left top and bottom corners to get a shadowy effect. Then add smaller ones in the top and bottom right corners. Now you should have something like the image above the “Step 9” text.
Final
Now you are all done and ready to add some lessons upon the board. Play around with it a bit and add some cool stuff to it. If you are having problems with the tutorial, please contact us or view the PSD provided from me below!
Click HERE to download the .PSD file!