Cool Web 2.0 Badge
Make a good looking Web 2.0 style Badge, in a easy way using the Polygon Tool and some Layer Styles.
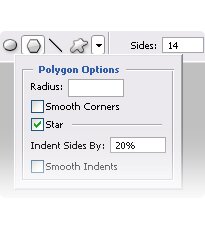
1. Create a Badge using the Polygon Tool.
2. Right click and Rasterize it.

3. Add a Gradient Overlay: #007cb3 to #00c8ff

4. And you got to have something like this:

5. Click over the thumbnail while holding Ctrl, to select the shape. Then go to Select/Modify/Contract and put 2 px.

6. Create a New Layer and Fill it with any color and change the Fill to 0% then add a 1px Stroke Transparent to Withe.

7. You should have something like this:

8. Create a New Layer, and make a selection using the Elliptical Marquee Tool.

9. Select the border’s layer then go to Select/Inverse and press Del, to delete the bright parts outside of the badge. Then change the Blending Options to Soft Light.

10. Add some text, using Segoe in white and press Ctrl + T to rotate it.

11. Add it Drop Shadow:

12. And Gradient Overlay: #e4e4e4 to #ffffff

13. That’s it, your own Badge 2.0
