Mac OS Template Tutorial
Introduction:
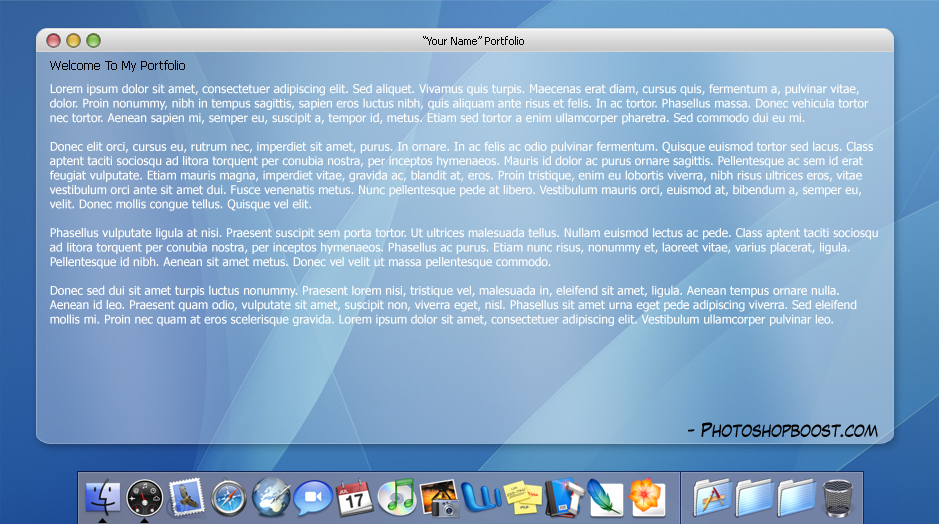
In this tutorial I will be teaching you how to make a portfolio template that looks similar to the Mac OS X design. After this tutorial all you’ll need to do is code the template and you’re ready to go! Below can be seen a preview of what the final result will be:

Step 1: New Document:Let’s first start off by opening up Photoshop and making a new document using the settings below:

Step 2: Template Background
Now let’s add the template background. We will be adding the Aqua Blue Mac OS X Wallpaper. You can make your own or download it here. Crop the part of the wallpaper you want and fit it into the new document.
Step 3: Template Body
In a new layer, make a nice-sized box using the ‘Rounded Rectangle Tool‘ where you will be placing all your content. Make sure to vertically-center it. Below is what it should look like:

To make your content box look exactly like mine use the settings below:

Step 4: Template Navigation Footer
We are now going to add the navigation for the template. Search online for a screenshot of a mac desktop. If you would like to use the one I used then click here. Now once you have that, move it down to the bottom of your template and center it. You should have something like this:

Step 5: Template Title Bar
To add the title bar get out the ‘Rounded Rectangle Tool‘ again and make a title bar at the top of your content box. Then go to Layer > Rasterize > Layer. Using the ‘Marquee Tool‘ cut the bottom half of the layer to make it look like a clean title bar. You should have something like this:

To give your title bar the effects that I have use the settings below:

Now let’s add the red, yellow, and green orbs at the left of the title bar. First, get your ‘Custom Shape Tool‘ and make 3 small circles. Once you’ve done that you need to apply these settings:
Settings for the Red Orb:
Settings for the Yellow Orb:

Settings for the Green Orb:

Now you should have those 3 orbs at the left side of your title bar.
Step 6: Adding Text
That last step was a lot of work so this step will be much easier! All we have to do is add a few lines of text here and there. All you have to do is add a Template Title on your title bar, your welcome statement, your content in the content box, and you’re ending statement! Here’s the final result of this tutorial:
(Click for Larger View)
And after all that hard work, you can finally enjoy your one-of-a-kind masterpiece!