Smooth Header Tutorial
In this tutorial you will learn how to create a website header (banner + navigation). Seen below is a preview of the final outcome:

Step 1: Base
Create a New Document with the dimensions of the banner you want to make, and include about 50px for your navbars (my document will be 780×200. Create a New Layer, and fill it with Grey (#797979).
Now go to your layer styles, and apply a gradient with these settings:

Step 2: Corners
Next we will be shaping our document so it has nice rounded corners. Pull out your Shape Tool (hotkey U) and change it to Rounded Rectangle. On the top bar, there is an option to set the radius of your rounded rectangular tool, set the value to 15px (MAKE SURE IT’S PX, THE DEFAULT IS INCHES).

Select your entire document, carefully as to not go outside of the canvas. Get your Pen Tool (hotkey P) and right click on your canvas space, and do make selection. Your selection should look like this:

Now press CTRL+SHIFT+I to invert your selection, and press Delete to delete the selected area. Press CTRL+D to deselect. Now if you didn’t select perfectly, press CTRL+ALT+Z a few times to undo back to just before you took your Pen Tool to make a selection. Press CTRL+T to transform your rounded rectangle box. Modify the box so that the selection is just right.
This is what your document should like now:

Step 3: Text
Find a font that looks good. I prefer fonts that are not flashy, extravagant, attention whores. A simple font such as Times New Roman is a beautiful one. Type your text out and place it anywhere except for the bottom 50px (where the navigation bar will go). Best places to put text is middle, left, right, bottom right, or bottom left. Position of the text will depend on how it ‘interacts’ with the flow. A nice touch that makes your text look very professional is to use a color, and saturation (black or white). Color the more important text, and saturate the other text. By doing this, the focus of the eye is drawn to the colored text, the more important text.
Duplicate your text layer and then right click on the bottom text layer (original) and Rasterize Layer. Press CTRL+U to modify the Hue/Saturation. Drag the saturation bar all the way to the left (-100) and press Ok. Do Edit>Transform>Flip Vertically and, this will flip the text so it will be in the right position to create a reflection effect. Position your ‘reflection text’ just under your ‘real text’. Press ‘Q’ to go into Quick Mask Mode. Get your Gradient Tool (G), start from the bottom of the text, and drag the gradient to the top of the box. Press ‘Q‘ to exit Quick Mask Mode, and then press Delete once or twice. Drop the opacity to between “20-40%“.
Step 4: Border
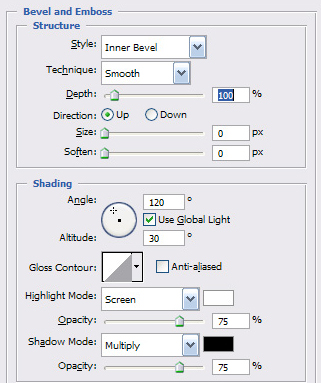
While still in selection with the rounded corners, create a new layer. Go Edit>Stroke>10px, Orange (#F39B3C), inside. Using these settings, go to your layer styles:


Step 5: Background
Now we will be adding a few subtle effects to our background. CTRL+LEFT CLICK on your background layer to select its contents (your selection should be rounded at the corners). Create a New Layer, and find some brushes that are mostly diagonal, a good mix of right to left and left to right diagonals is best. Brush so it looks like my example. Since this is a tutorial, feel free to modify anything. The feel I was going for in mine was sort of a blossom or explosion from the middle out. Depending on where you place your text, you may find that it looks better if the ‘explosion’ or ‘blossom’ is coming from where your text is located. Something that might look nice other than this blossom explosion from the middle is to have the brush strokes sweep from only one side, and fade towards the middle. Anyways, after you get some nice brush strokes, lower the opacity to something fairly low (I used 28% for mine) so the brush strokes are very subtle, and not drawing attention or focus to the background.
Create a new document, 3×3 pixels with a transparent background. Zoom in 1600%, and use your pencil tool at 1px black to create 3 dots like so:

Go to Edit>Define Pattern. Name it something like diagonal scan lines. Now go to your banner document, create a New Layer, and go to Edit>Fill making sure to still have your selection with the rounded corners.

Drop the opacity considerably (I used 28%, seems to be a good percent), and change the Blending Mode to ‘Overlay‘.
Get your Gradient Tool out, and press ‘Q‘ to enter quick mask mode. start the bottom of the document, and drag up to the top. It should look like this:

Press ‘Q‘ again to exit quick mask mode. You should now have a selection, press Delete. You have essentially just applied a scan line to transparent gradient.
Step 6: Navigation Bar Base
Get your Rounded Rectangular tool once again to make your navigation bar. Draw your nav bar like so:

Then get your Pen Tool, right click, make selection. Create a New Layer, and fill with orange (#F39B3C).
Step 7: Navigation Bar Chopping
Now it is time to put text on the nav bar. Place text for each link you want to include (I used home, downloads, forum, and search on mine). Space them out accordingly:

With your nav bar layer selected, use your Rectangular Marquee Tool to make selections for your buttons. Select your nav bar in relation to your text, CTRL+X (cut) then CTRL+V (PASTE). You may have to reposition the piece of navbar you just cut out. Apply these Layer Styles to each portion of the navbar:

You should now have this (I left out the navbar piece behind the ‘downloads’ text to help illustrate the previous step):

And there you have it Ladies and Gentlemen, a finished Header and Navigation Bar, smooth and sexy style. Final image is below:
