Animated Polaroid Photo Gallery
Introduction:
In this tutorial I will take you through very detailed steps on how to create an Animated Polaroid Photo Gallery (See Figure Below). So let’s get started…
What You Need:
–Polaroid Brush Pack (click to download)
Step 1: Collecting Your Photos
This part of the tutorial is completely up to you. Before we start anything you need to collect all the photos you want to appear in your gallery. Once you’ve completed this step you can move on to the the next part.
Step 2: Gallery BackgroundThis part of the tutorial is also up to you. I picked a nice wood texture that looks great with the colors I have. If you would like to download that exact texture that I used then click here. Once you’ve gathered your background/texture and all your photos let’s begin opening a new document…
Step 3: New Document
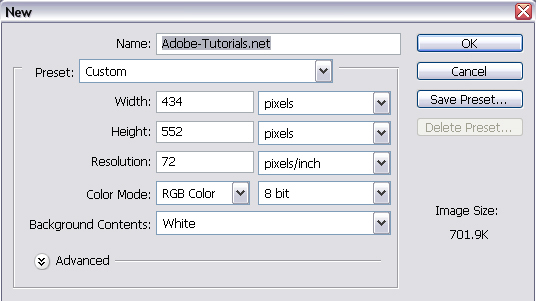
Once you’re in Photoshop, open a new document. The settings I used for my new document were: 434 x 552. I then dragged my gallery background into that new document to make it the background.
Step 4: Adding The Material
In a new layer I used the ‘Polaroid Brush Pack’ and made a single Polaroid. After that I made a new text layer and added “Adobe-Tutorials” on the bottom of the Polaroid. Now you should have everything for your gallery except for your main photos, so let’s add those. Drag in all the pictures you would like to appear in your gallery to our current document. Make sure to have each photo on a separate layer. Once you have each photo there, fit each one to fit exactly inside the Polaroid to make it look clean. In your ‘Layers Palette‘ you should have the Polaroid above the photos. Now to keep you updated heres a screenshot of what I’ve done so far:

Here you only see my first photo but my other photos are under that. If you are using the background texture I used and you want to know how to get that nail over the Polaroid then just select the Polaroid layer and take a small eraser brush and just erase it right where you want the nail to show. If you’re also wondering what font I used, it’s called ‘Hurricane‘ (click to download). Now lets move on to animating this to show the other photos in the gallery…
Step 5: Animated The Gallery
The first thing I want you to do is go to the top of Photoshop to Window > Animation. Once the Animation Window is up I want you to notice the 1 frame. Now in a new layer we’re going to add a small white square that fills the inside of the polaroid, just like one of your photos would. This might be tricky for some people so here’s a screenshot of that white square in the polaroid:

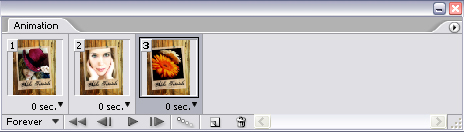
In your Layers Palette place that white box after the background layer (so it’ll be second from last). Now that we’ve got that white box up there we can officially start the animation. Go back to your first frame in the Animation Window and duplicate it the amount of times you have photos (if you have 5 photos, have 5 frames). Now have the photo that you first want to appear when the gallery starts in the first frame. You can hide all the other photos (layers) by making sure the little eye next to the layers is not selected. In the other frames do the exact same thing so that in each frame, there is a different picture. To make sure you’re on track, here’s a screenshot of my Animation Window:
Step 6: Transition Effect
Now that we’ve got each photo in a separate frame we can do the transition effect from each frame to the next. First duplicate the first frame and move it to the last frame. So you will have the first and last frames the same. Now select the first frame and click the ‘Tween‘ button at the bottom of the Animation Window and a ‘Tween‘ dialog box will pop-up. For best results use the settings I used: (See Figure Below)
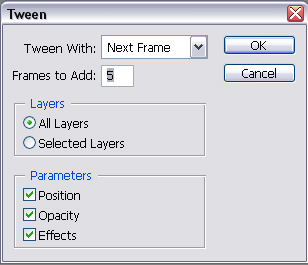
Now Press “OK” and look in your Animation Window. You should have an extra 5 frames that transition the first frame to the second. Now do that step for each frame to the next. Now you can change the ‘Delay Time‘ for each frame to make it how you want. I used “2” seconds for the full photo frames and “0” seconds for the transition frames. Press the ‘Play‘ button to make sure your animation is how you want. If it’s not go back and customize the options. To learn how to save it and upload it to the web, check out the next step…
Step 7: Saving Your Animated Polaroid Photo Gallery
This is the easiest part of the tutorial! Go to File > Save for Web > Save > and save in a location. Make sure you save it as a .GIF file format. Now you can upload your beautiful Animated Polaroid Photo Gallery to the web! Below is the final result I achieved: