Comic Text Effect
Introduction
Welcome to the tutorial, you’ll be learning how to make some retro, cartoon-styled text.
The result image is shown below:

Step 1
First of all create a new document. I used a document size of “400×200”. Fill the background with a nice, light-colored gradient. The colors I used for my gradient were “#bac6f0” and “#e598a1“.

Now I added in some retro half-tone patterns into the background. You can find a nice tutorial for this effect here.

Step 2
Now, you need a font to suit the “Cartoonish” theme. Head over to DaFont.com and pick out a nice cartoonish font. The font I used is called “BadaBoom BB“, you can download it from here.
Now write out your text in a medium-red color. The color I used was “#921313” and the size I used was “60 pt”.

Step 3
Now, right-click the text layer and go into “Blending Options“.

Now, click and apply the following layer styles:
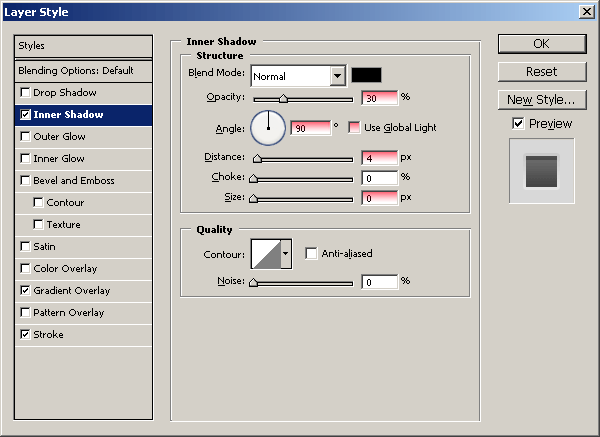
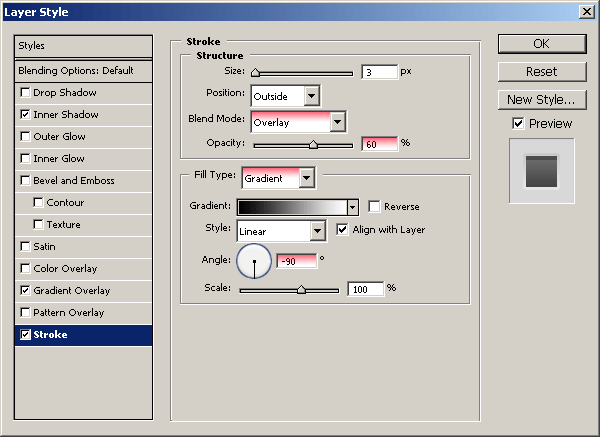
Your text should now look like this:

Step 4
Now we’ll add some more effects to the text.
First, make a selection around the text by holding “ctrl” and “clicking” the text layer’s thumbnail.

Be sure you’re on a new layer, then fill the selection with white (#FFFFFF) Now move the selection down 1 pixel, press “delete“.

Move this line down 1 pixel, then change the Layer Mode to Soft Light, you can leave the opacity at 100%.

Again, make a selection around your text then make a new layer. Fill your selection with black (#000000), then move the selection up 2 pixels and press “delete”.

With a soft brush, erase the top of the black stroke, change the layer mode to “Soft Light” and lower the opacity to about “60-90%“.

Lastly I added in some glossy shine, you can do this by following these simple steps:
- Make a new layer then make a selection around the text.
- With the gradient tool, draw a “White to Transparent” gradient from the top of the selection to the bottom.
- Make a selection of the bottom half of the gradient, delete this part.
- Change the layer mode for the gradient layer to “Soft Light” and lower the opacity if necesary.

Step 5
Now, I always like to add post effects. First merge all the layers together, or copy the whole thing into a New Layer. Then apply (Filter > Sharpen > Sharpen), fade the sharpen, (Edit > Fade Sharpen) then apply Noise, (Filter > Noise > Add Noise)
Thanks for reading the tutorial, I hope you enjoyed it!