Creating an AIM Icon
Introduction:
In this tutorial I will take you step-by-step to teach you how to make your very own AIM Icon! AIM Icons help to express user’s hobbies, interests, favorites, etc. The icon below is the AIM Icon I made for a band. Ready? Let’s go…

Step 1: Icon Ideas
Hopefully you’ve come here and already have an idea of what you want your icon to be on. Now remember, AIM only allows you to upload 7168 bytes. This means we’re going to have to keep our Icon simple. I would suggest having a color or gradient as the background and around 2-3 lines of text. If you have your ideas thought out then let’s go to step 2…
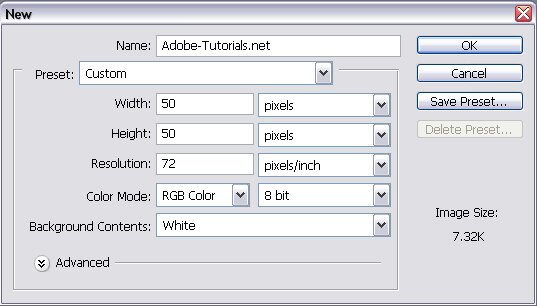
Step 2: New Document
Open up Photoshop and create a new document with the settings below:
Step 3: Gradient Effect
Let’s get out our Gradient Tool and make a nice gradient, with the color of your choice. I used a gradient of Black to Dark Grey.
Step 4: Adding Text
Now we’re going to add a few lines of simple text. I added “The Survival Instinct” with each line in a different layer. I added no effects to the font to keep it extremely simple. After adding your text should should be done designing! Now let’s go on to saving your icon.
Step 5: Saving Your Icon
We’re going to save it as a JPEG so simply go to File > Save As > OK. Remember where you saved it so you can upload it to AIM. To learn how to upload your icon to AIM go to the next step…
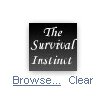
Step 6: Uploading Your Icon To AIM
Go up to the top of your AIM Buddy List Window and click Settings. Find the ‘Expressions‘ tab and then look for ‘Browse‘ and click it (See Figure Below). Browse for you icon that you just made and click “OK“. Your icon should pop-up and you’re good to go! If your icon doesn’t upload the first time because it is too big, then go back to Photoshop and try to make it smaller.
After you have uploaded your icon to AIM you can start your IMing and show off your cool new AIM icon to your friends!