Easy Slicing In ImageReady

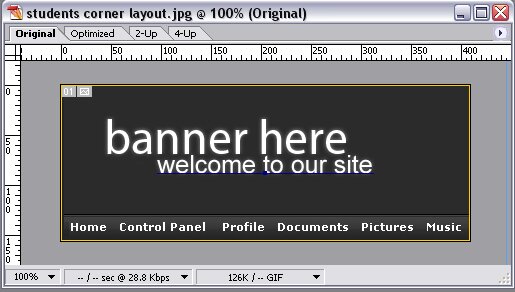
Above is the Image I will be slicing.
I will be slicing this head banner and navigation for a website.
Things You Need:
-Adobe Photoshop
-Adobe ImageReady
Photoshop Part:
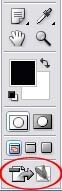
To start off let’s open up Photoshop. Once you’re in Photoshop, open the image you would like to slice. Once the image is opened click the ‘Edit in ImageReady’ button at the bottom of Photoshop Toolbox (See Figure Right)
ImageReady Part:
Once we’ve brought that image in to ImageReady, you can close Photoshop. Your image should look similar to this once its in ImageReady (See Figure Below).
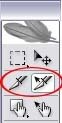
Now go to the ImageReady toolbox and click the ‘Slice Tool’ (See Figure Right). Now make a selection on each part that you want to have a link to. I made a total of 7 slices (1 for each navigation options and 1 for the banner). When slicing, make sure each selection is a not touching another, because that can cause bad linking. Once you’re done slicing you should have something looking this my image (See Figure Below).
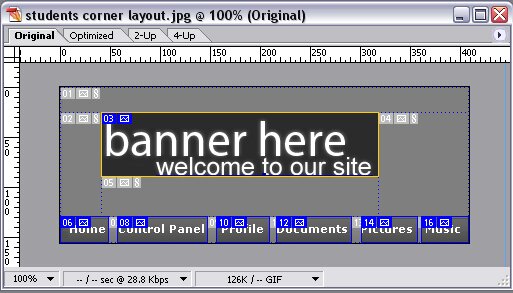
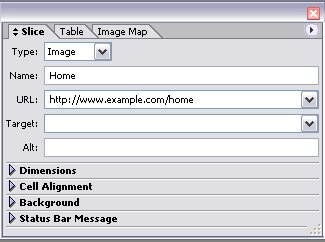
Now we’re going to type the URL for each slice. Select the ‘Slice Select Tool’ which is located directly to the right of the ‘Slice Tool’. Use that tool and click on each slice and type in the URL that you want it to link to. Below is an example of one of mine.
Once you are done linking each slice, then you’re done slicing and we can move on to saving.
Saving Your Sliced Image:
This is going to be quick and simple. Go to File > Save Optimized As. Use the settings below while saving. Once you’ve saved it to the location of your preference, you are finally done! Now you can open the “images” folder that ImageReady.
Input The Slices To Make A Whole Image:
If you open up that folder called “images” you’ll see many parts of your whole image. To make it whole again and upload it to your site you have to upload each sliced image onto an Image Hosting Site and then open the HTML file that was also saved with the “images” folder. Once you’ve opened that HTML file and have all your images uploaded, you have to replace each New image (from hosting site) into the HTML file. This will make that image whole and viewable on the web. Now just upload that HTML file, with the new images, to your site. Now you’re done!