Make Your Own RSS Feed Icon
Learn how to make a classic RSS Feed icon with a unique style.
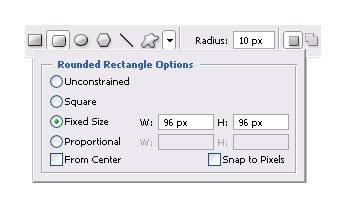
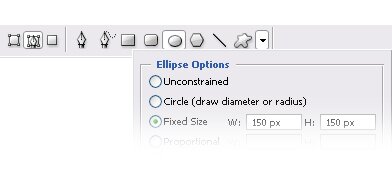
1. First create a square using the Rounded Rectangle Tool and use the Geometry Options as you can see below. With this we’ll be doing a square with a size of 96px,if you want can use another icon size like: 128px, 64px, 48px, 32px, 24px, 16px, 12px or 10px. If you prefer it can use you own customized size.
2. Now you should have something like this.

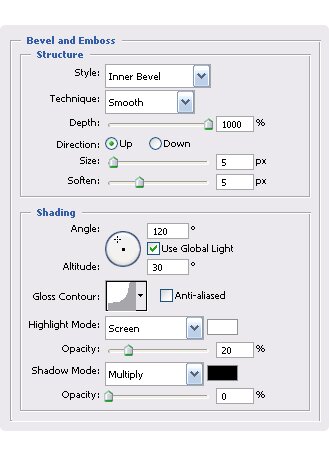
3. Then open the Layer style’s window (right click over the layer/Blending Options or simply double click over the layer) and select Bevel and Emboss and use the following values.
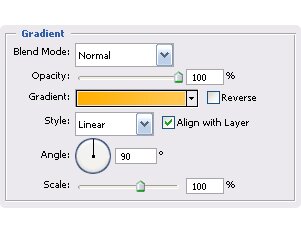
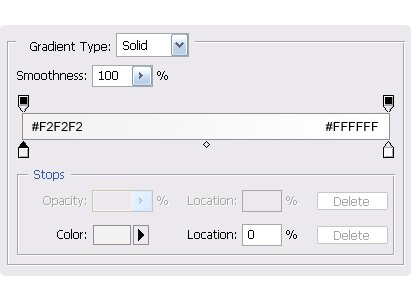
4. Now go to Gradient Overlay. And if you don’t like orange can use your own it doesn’t matter. I used #ffaf04 to#ffc853.
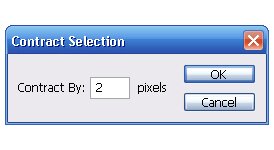
5. Press Ctrl+Click over the square layer thumb to select it. Now go to Select/Modify/Contract and put 2 px.
6. Make a new layer and fill it with the bucket, could be any color it doesn’t matter and press Ctrl+D to deselect
or Select/Deselect.
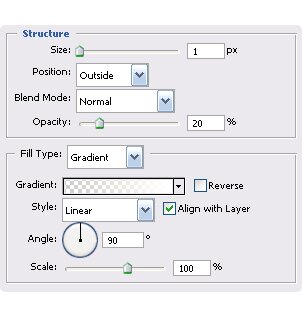
7. Change the fill of the layer to 0% and Open the Layer Style’s window. Select Stroke and put the following, for the Gradient use a Transparent to White gradient.
8. Make another layer and then with the Elliptical Marquee Tool make a selection, make it a perfect circle by pressing Shift at the same time.
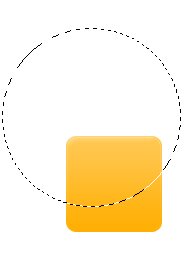
9. Now with the Gradient Tool make a Radial Gradient, do it holding Shift as you can see below. Now deselect it pressing Ctrl+D or go to Select/Deselect.
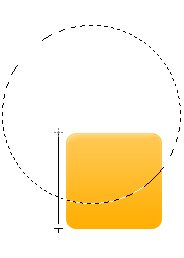
10. Then we’re going to select the square layer, press Ctrl+Click over the square layer thumb then go to Select/Contract and put 1px and then Select/Inverse or Shift+Ctrl+I. Now select the layer where you made the Radial Gradient and press Delete. Deselect it and you should have something like this.

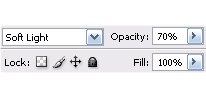
11. Change the Blending Options to Soft Light and the Opacity to 70%.
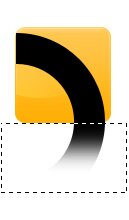
12. You should have something like this.

13. Now we’re going to make the RSS symbol. Using Fixed Size we are going to make a circle then right click over it go to Make Selection then fill it with any color, now go to Select/Contract and put 25px (with this we’ll make a smaller circle) and delete it, you should have something like a ring.
14. Cut it using the Rectangle Marquee Tool.
15. Then Ctrl+Click over the layer to select it and go to Select/Smooth and put 10px. After these go to Select/Contract and put 6px. Go to Select/Inverse and delete it.

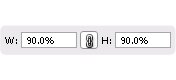
16. If your shape is bigger than your icon you can resize it, press Ctrl+T and change the percentage to 90%, press the “Mantain aspect ratio” button and then press return.
17. Duplicate the layer. Click over the layer and then Duplicate( go to Layer/Duplicate Layer) and resize it to 70%. Then go to Layer/Merge Down or press Ctrl+E with this you will have one layer for the RSS symbol.
18. Now in the same layer While pressing Shift, make a selection with the Elliptical Marquee Tool then fill it with any color.

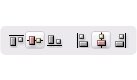
19. To center the RSS symbol first select the square layer once again and choose the Move tool(V)  and align it using the buttons shown below wich appears in the top toolbar. Align vertical center and Align horizontal center. Then deselect it.
20. Open the Layer Style’s window. Go to Gradient Overlay.
21. And you’re done, your own RSS Feed icons. I hope this tutorial was helpful to you.
![]()