Myspace Layout: Skyline
Learn how to make a MySpace theme on a nice Skyline car with this Adobe Photoshop tutorial, a preview can be seen below:

This tutorial will be more focused on the myspace code and how to go about making a myspace layout rather than a photoshop aspect. I have included a site to customize your colors of borders and text and such that will give you a code, and then I put the code you insert to get the custom contact table and extended network image. With that being said, let’s get rolling.
First thing you will want to do is pick out pictures that are similar. Most likely they will be the same thing in different views or poses. It’s possible to use the same image for all 3 images, but I find that it wont look nearly as good. Another thing you will need to do is decide on a color theme for your text and borders based on your image(s).
Start out by creating a new document that will become your background image. I used a 1284×900 canvas, although you can use whatever size fits your computers resolution. Slap on a render, and start making your background however you like. Here is the background image I will be using:

Next up is the extended network table. I’m not even sure of its uses on myspace, but it makes a nice place to put an image.
Create a new document. For this tutorial, my extended network table will be 435×250.
The code that I have included at the end of this tutorial is set to 435×250 dimensions. If you want to use a different size, you will have to change the code a bit.

Now it is time for the contact table. This one takes a bit more work to set up the buttons. For ease of use, I have made a button template.

You’re going to want to SAVE, not copy, this template.
Create a new document, 300×150 pixels.
Your may want to place your buttons first, and then make your image in conjunction with the buttons. Or you may want to just slap the buttons on top of the background. But either way, you will need to use the template so you know where the buttons have to be.
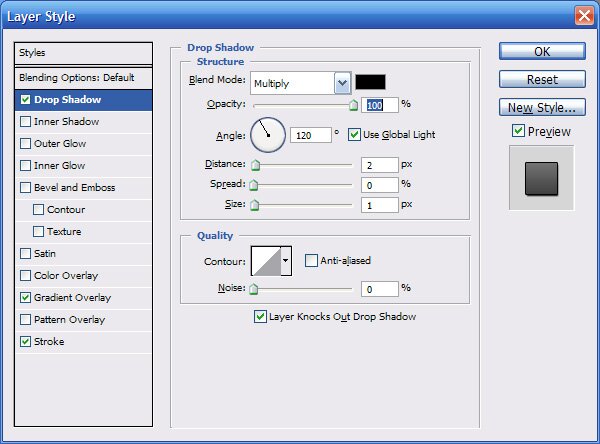
When you’re making the buttons, you don’t need to illustrate all of them, but you will want to include the send message and add friend button for sure. If you want more room for the image in the contact table, you can choose to not illustrate buttons for all the buttons on the right side. However, they will still be functional links on your page. Here is the settings I applied to my buttons:


You have made all 3 of your images, and you’re ready to code them in your myspace page. Start out by going here (freecodesource.com) to create your code for text and borders. You will also add your background image here. Make sure you find a webhost (I recommend imageshack.com or photobucket.com) to host your 3 images, so do that now before you go any further.
After you have finished doing all of that, you will be given a code to copy and past into your about me section. Here is the instructions incase some people don’t know how.
How to Install:
1. Login to your MySpace Account
2. Click the “Edit My Profile” link on the right side of your profile picture
3. Click the “(edit)” link next to the box titled “About Me”
4. Copy (CTR+C) the code below and paste (CTR+V) it into the “About Me” box, then click the “Preview” button
5. Next, click the “Submit” button
6. Click the “View My Profile” link near the top of the page, and that it. Your new layout is installed.
Important Note: If you have another layout installed on your page, remove it before adding your new layout code.
Copy and paste this code into your About Me section to insert your contact table graphics. Replace the bold and underlined text with the URL of your contact table:
This next set of code is to insert your extended network table. Again, I have underlined and bolded what to change. The first underlined bold text should be replaced with the URL of your extended network table. The second underlined bold text is for the dimensions of your extended network table. These values should match the size of your extended networks table. Paste this code into the About me section: