Trendy Text

Step 1:
As you can see above, this tutorial will help you create trendy text, yet in a professional manner. You can open any size document for this text. I chose the 300 x 100 size above. Next, we will make our background upon where our text will be placed.
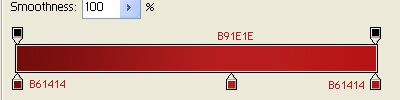
I used three different gradients seen here:
Step 2:
Now, we are going to focus on the text. I choose Trebuchet MS size 36, and aa set to strong. Doesn’t matter on color, I chose white. Position your text to your liking, likewise with the bold and italics.
Step 3:
Finally, right click and duplicate your text layer. Then, color the copied layer to a darker tone to suit the background. Move the darker copy behind the text and position down a little bit, so it appears as though the text has a shadow.

Step 4:
Once that is done, you can add whatever you like to customize it. I added a radial gradient behind the text.

Then you are done!
Click here to download the PSD from www.avivadirectory.com/photoshop.