Turning Yourself into a Werewolf with Photoshop
As it is nearly Halloween again, I think it’s time for a horror Photoshop tutorial. The thing is, there are tons of Zombies, Vampires and other assorted ghoulie tutorials out there, but as yet very few werewolf ones. So here goes, get ready to grow some hair and bark at the moon. By the way, if you are looking for a quick, 5 minute tutorial, keep looking! This is going to take some time, so be prepared.
Step 1
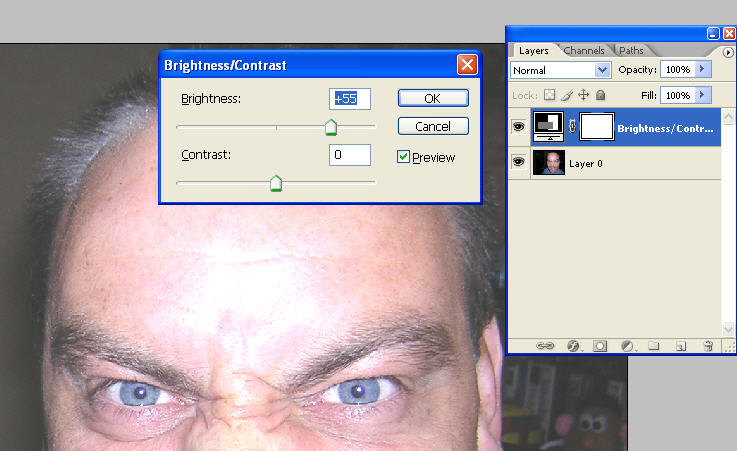
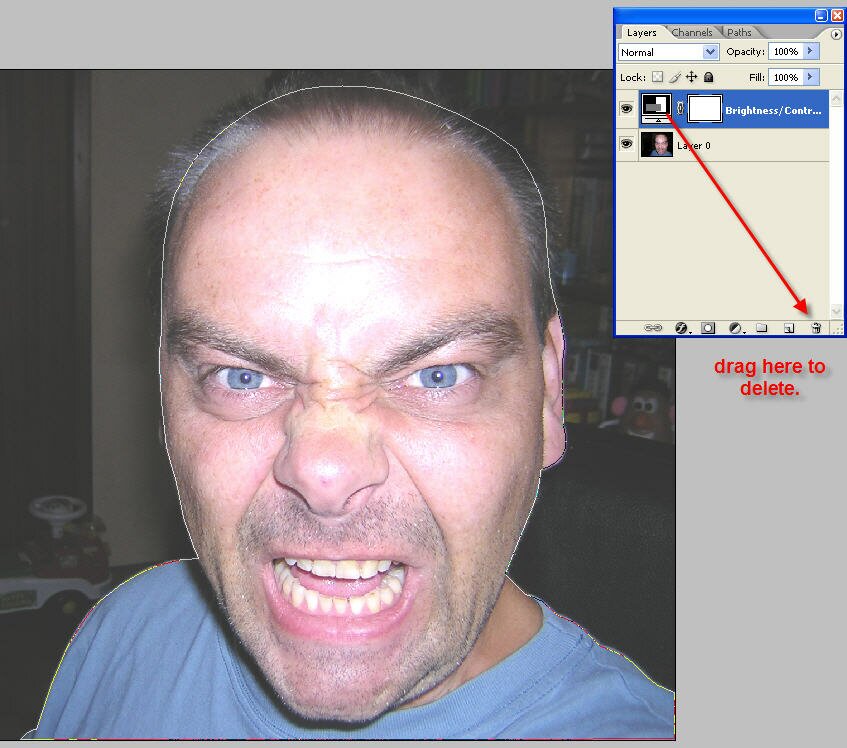
I’ve chosen this good looking, young, blue eyed guy for this tutorial. Ok, I’m old and bald. But not for long. The first job is to cut out the face and body from the background. For this, we’re going to use the dreaded pen tool. Don’t worry though, it’s not as bad as you think it is. First though, we need to lighten the image. I don’t want to make any changes to the image, so we’re going to use an adjustment layer. With this, we can lighten the image and after just delete it. Click the little black and white circle at the bottom of the layers panel, and choose ‘Brightness/contrast’ from the drop and menu. A new screen pops up where we can increase the brightness.
Step 2
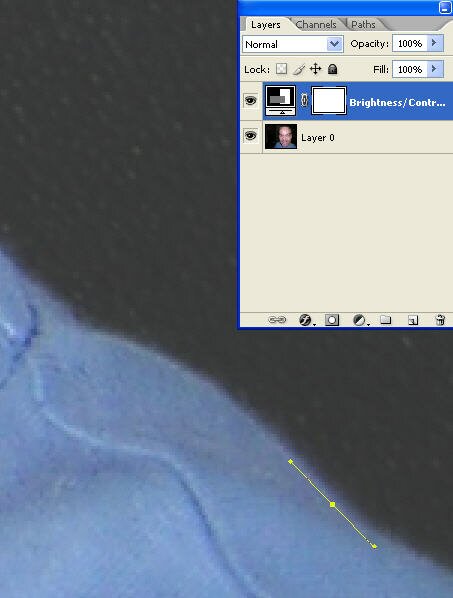
Now press ‘Z’ for the zoom tool and zoom until you get to 300%. Pres ‘P’ for the pen tool, and click and drag along the shirt’s edge, making sure you do it just inside.
Step 3
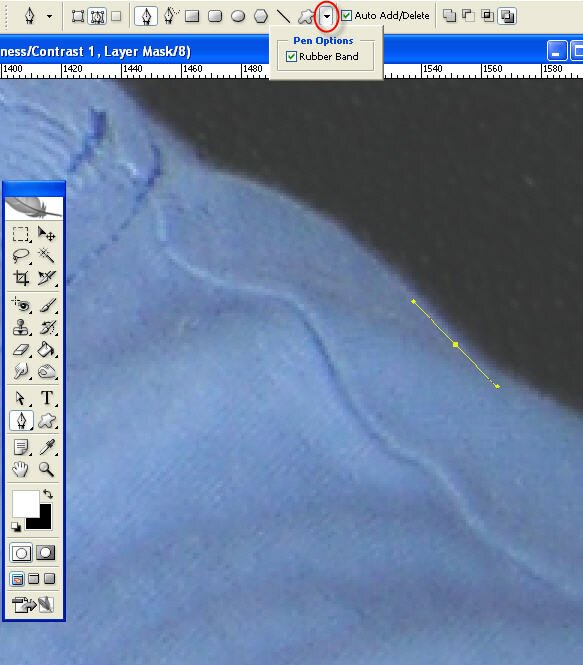
If you look at the top menu bar for the pen tool, you will see a little black arrow. Click it and turn on ‘Rubber band’. This allows the pen tool to follow the cursor and it makes life much easier. Why Adobe doesn’t have this turned on by default is anyone’s guess.
Step 4
Continue click dragging and try to get a nice shape by following the contours of the shirt. It’s a bit clumsy at first but you will soon get the hang of it. Where the neck intersects with the head I clicked but didn’t drag, as the contour is more angular. Incidentally, if you want to edit the pen tool line, just press ‘A’ and select one of the points. Then you can move the handlebars wherever you want.
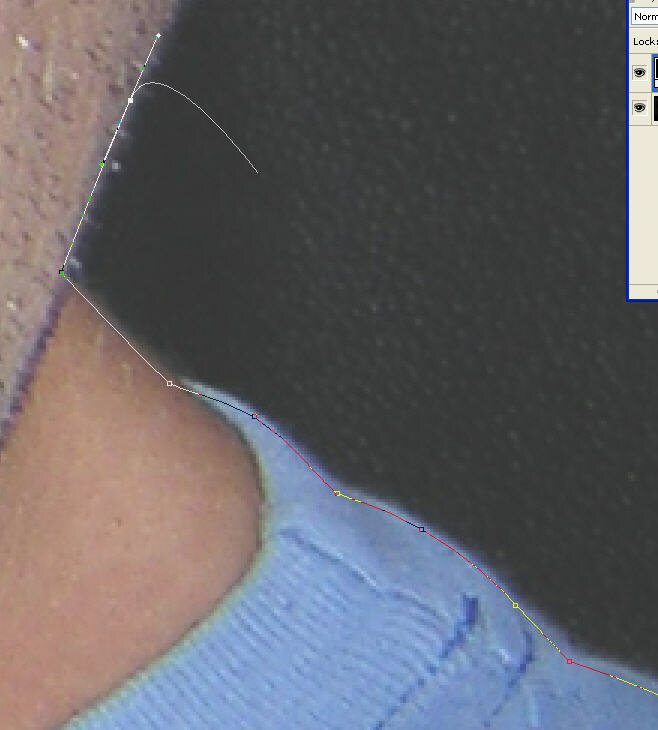
Step 5
Another great tip is to use the Space bar to move the canvas around instead of the side and bottom scroll bars. This really speeds things up. Carry on around my head (be careful!). You don’t really need to be very accurate here, as later on we’ll be covering it with hair. When you’re finished, press ‘Z’ again, and while holding the Alt key, click to zoom out. Now you can delete the adjustment layer by dragging the layer in the layer panel over to the trashcan (or dustbin, as I’m English. Mind you, we don’t have dustbins anymore, so drag it over the wheelie bin).
Step 6
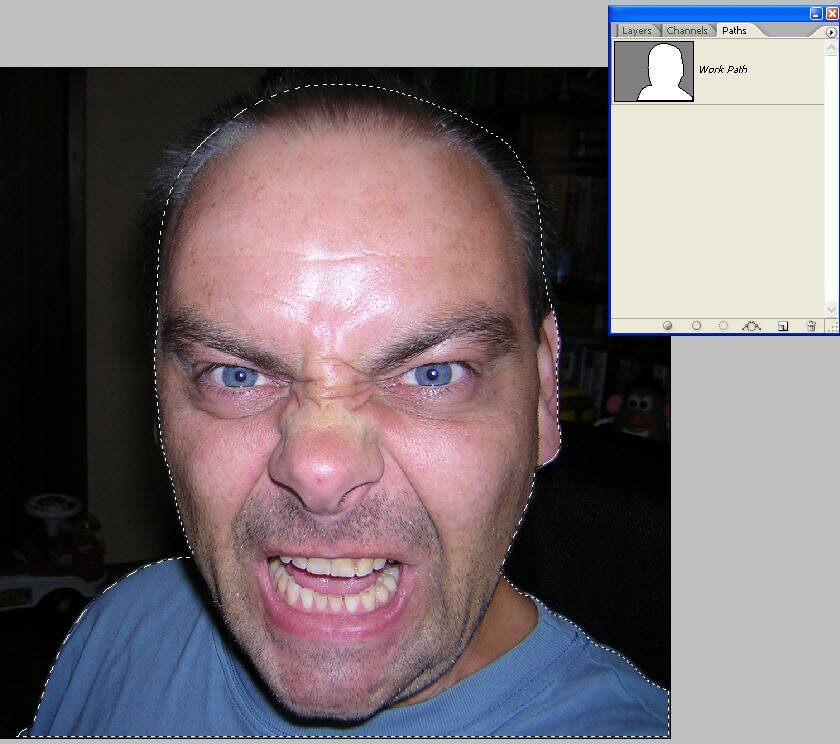
Click on the Paths tab, then CRTL+click the thumb nail to make a selection. Then simply CRTL+J to paste the selection onto a new layer.
Step 7
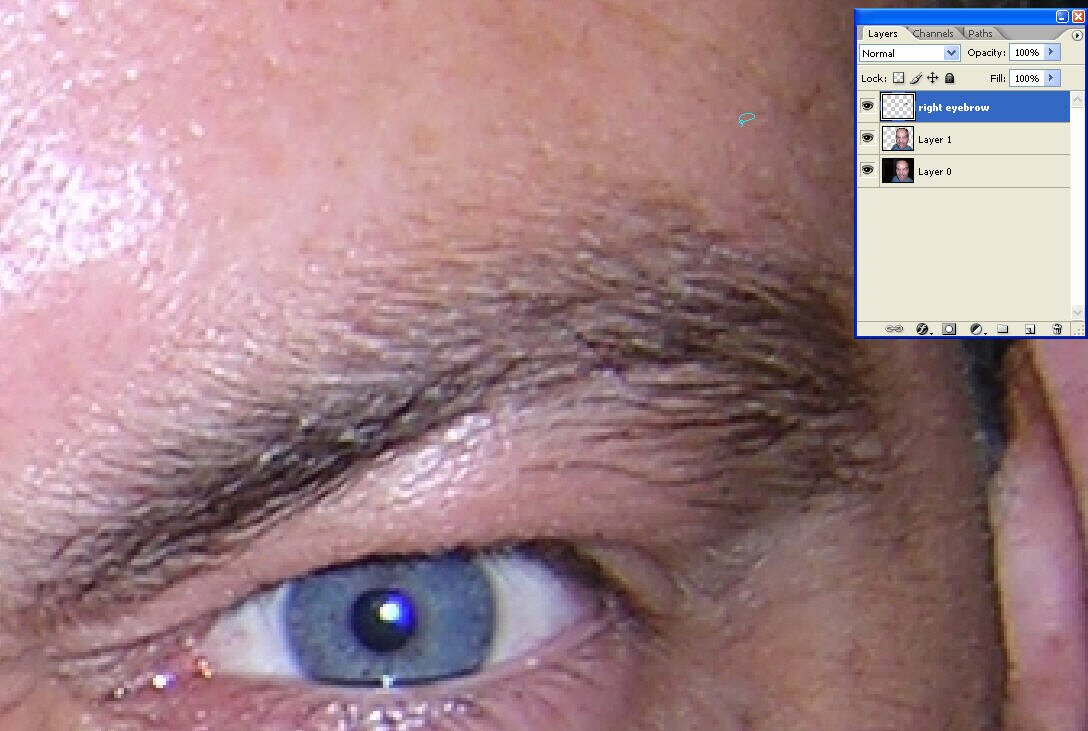
Were you hoping for a short, five minute tutorial? Oops, sorry to disappoint. This is where things get complicated. But that’s good, right? Now we’re going to start work on the hair. But how do we get hair? I hear you ask. Well, the eyebrow. Yep, the eyebrow. Anyone have a problem with that? Zoom in and hit ‘L’ to activate the lasso tool. Trace around it and press CRTL+J again to paste to a new layer. It’s good practise to rename layers, by the way. Just double click ‘layer 0′ layer 1’ or whatever and type what you want.
Step 8
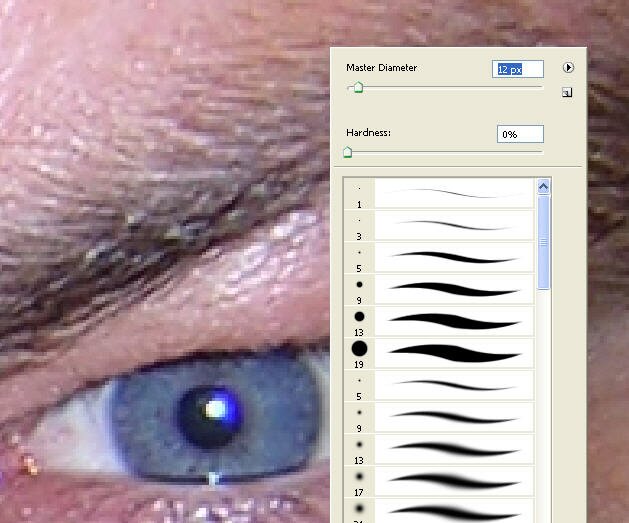
Here goes. We’re using the clone tool now. Hit ‘S’ to activate it. If the clone brush is too big you can make it smaller by right clicking. A screen pops up where you can change the diameter, hardness and type of brush you want. You can see here I have chosen a small, soft brush.
Step 9
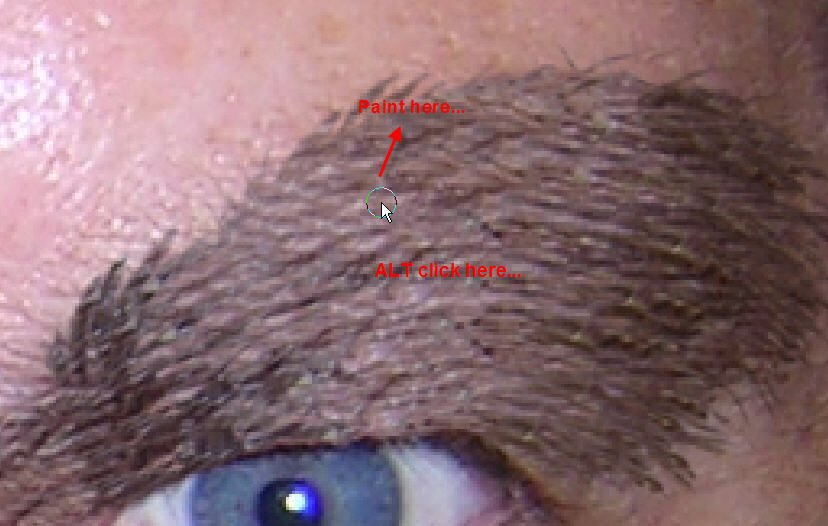
Right, let’s do some cloning. Pick an area of eyebrow in the center and ALT click. This selects the point where the cloning will begin. Incidentally, I am using a digital tablet with the brush set to pen pressure. You can still do it with the mouse, but if you are serious about Photoshop I’d recommend you buy one. You will see lots of talk about Wacoms, but there are other brands which are just as good and much cheaper. But try to clone too much at one time, as this causes repetition. Alt click, paint a bit, then ALT click another bit and repeat. Also, don’t paint too far away from where you ALT clicked, as the colors will often be very different.
Step 10
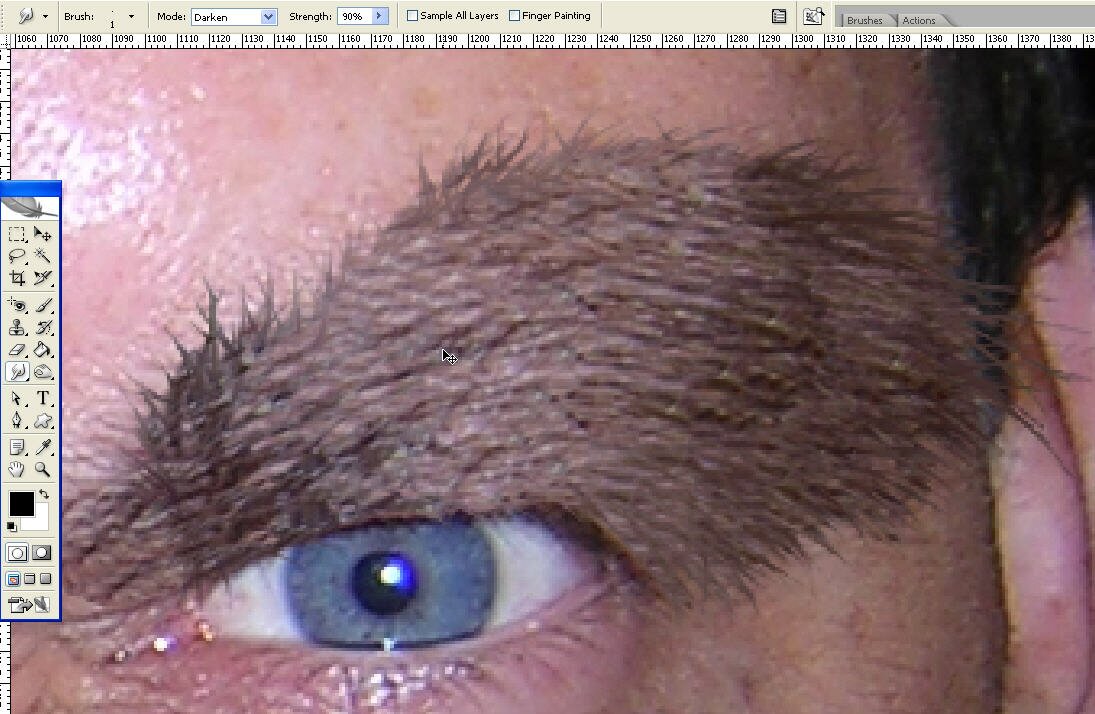
Ok, time for some Smudging. Press ‘R’ on the keyboard. Right click again and this time choose a brush size of 1. I have also set the strength to 90%. Now you need to ‘paint’ from inside to out. You will see hairs starting to sprout out. Go with the direction of the hairs for a more natural effect.
Step 11
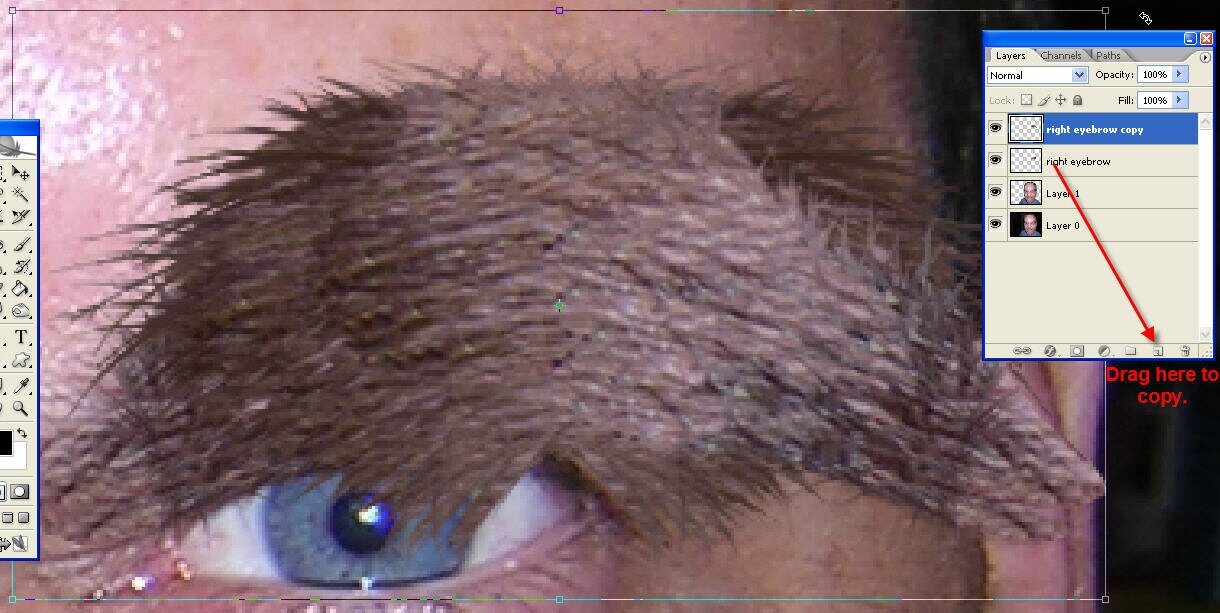
Now we are going to copy the eyebrow layer and flip it. First drag the layer to the ‘Create new layer icon’. Press CRTL+T to enter transform mode. Right click and choose ‘Flip Horizontal’.
Step 12
Now move and position it over the other eye. You might need to rotate it a little. Just hover the cursor over the outside of the bounding box and it will turn into a bent arrow. Then you can drag it and it will rotate. It may be a good idea to use the clone and smudge tools a little on the new eyebrow to lessen the repetition.

Step 13
Now for a cheek. Copy an eyebrow layer again like before, CRTL+T to rotate and move into position. Make sure the hairs are growing in the right direction! Very importantly, move the new layer under the eyebrow layers.
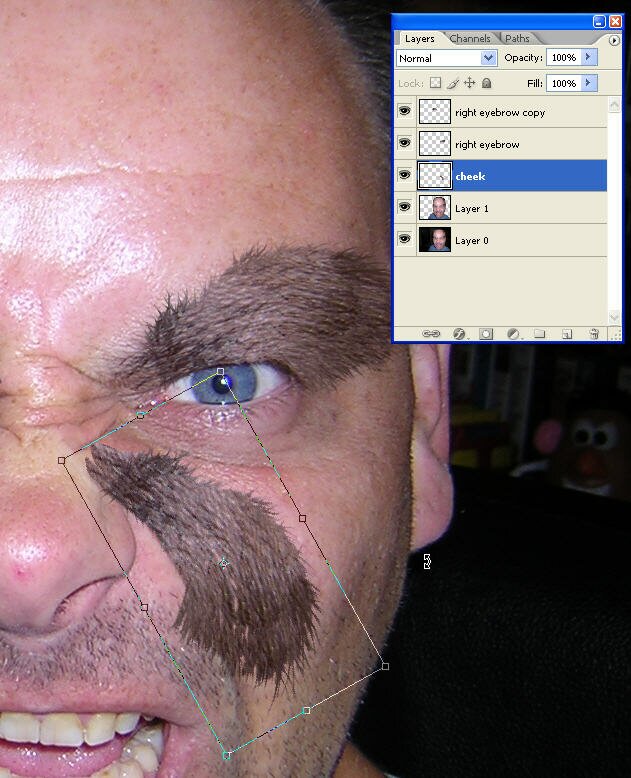
Step 14
Hit ‘E’ for the Eraser tool and get rid of the bits we don’t want. Now it is a question of cloning and smudging again to fill the cheek. Sorry!

Step 15
Spend as much time as you can to get the hair to look even. You will find when you copy layers that the chair color starts repeating too much. This is where the cloning and smudging comes in, along with a lot of patience. Notice that the eyebrow is on top of the cheek hair, where we wanted it. When you’re happy with the results, copy the layer, flip it and move into position on the other cheek.
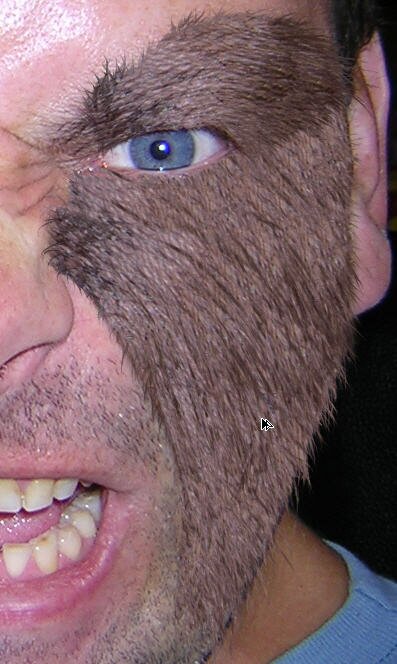
Step 16
Carry on copying, cloning, moving, etc until all the face and neck are finished. When you’re absolutely sure you’re happy with the hair, click the top hair layer on the layer panel and CRTL+E to merge it with the hair layer underneath. Repeat this until all the hair layers are together.
Step 17
Zoom in and bump up the smudge tool strength to something like 98%. Now we’re going to make some longer hairs around the face. Take your time here, and with each stroke try to bend the hairs downwards.
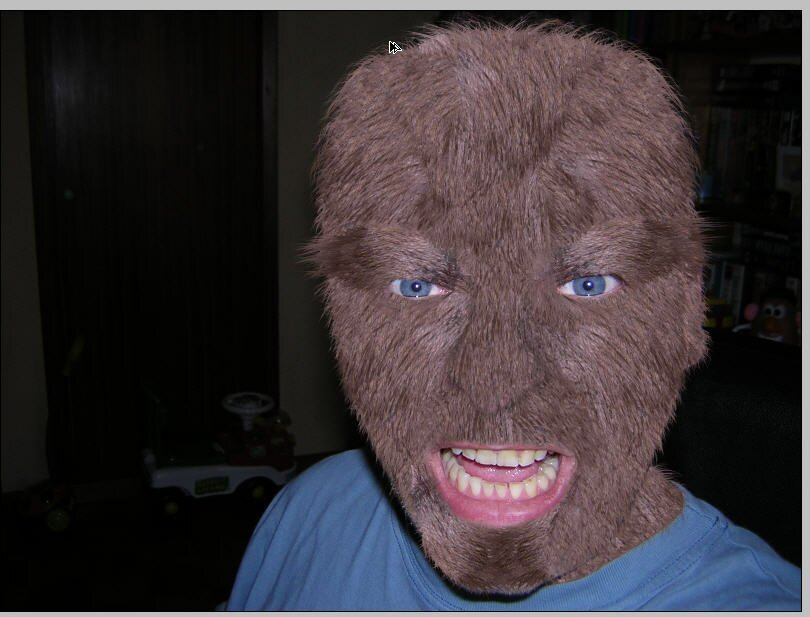
Step 18
Now I doubt whether werewolves drink coffee and smoke so I want to whiten the teeth a bit (ok, a lot). Zoom in and hit ‘Q’ to activate the Quick mask. Now hit ‘B’ for the brush tool and ‘paint’ over the teeth. That red you see isn’t paint but a selection. When you’re done, it ‘Q’ again, then SHIFT+CRTL+I to invert the selection.
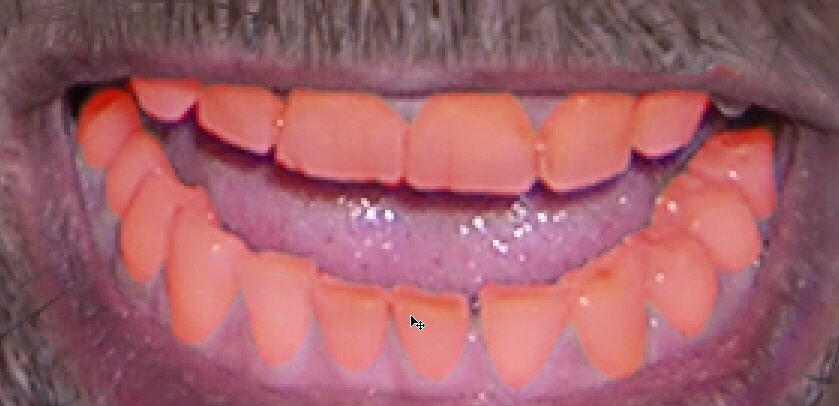
Step 19
I suppose you think we’re going to add white, don’t you? Wrong! The best way to whiten teeth is to reduce the yellow. CRTL+U to open the Hue/Saturation screen. From the drop down menu at the top choose ‘yellows’ and reduce the saturation. You can increase the brightness a little, too.

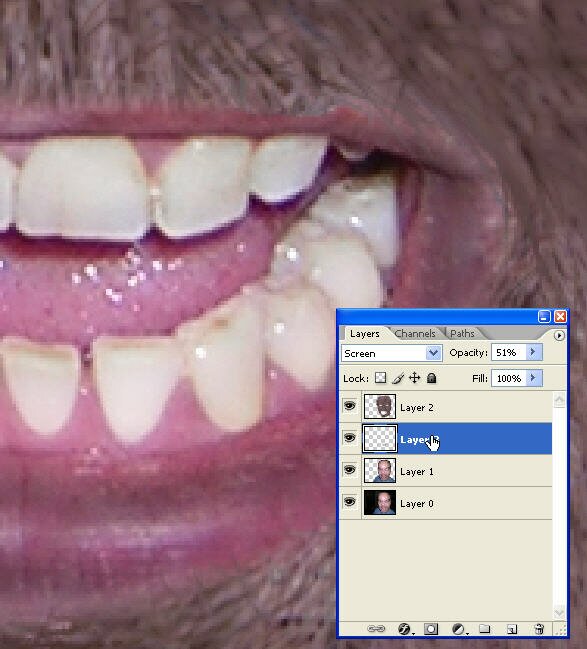
Step 20
With the teeth still selected, CRTL+J to paste them to a new layer and change the blend mode to Screen. Lower the Opacity to something like 50%. Now you have nice white teeth to tear and rend.
Step 21
Actually, there is one more job to do on the teeth. We need to merge the teeth layer with the layer underneath, but if we use CRTL+E we’ll screw up the layer blending. So, Hide the hair layer and the very bottom layer. Then click the little black arrow on the right. You get a list of options drop down. Choose ‘Merge Visible’. Now the two layers are merged together without the blending being effected.

Step 22
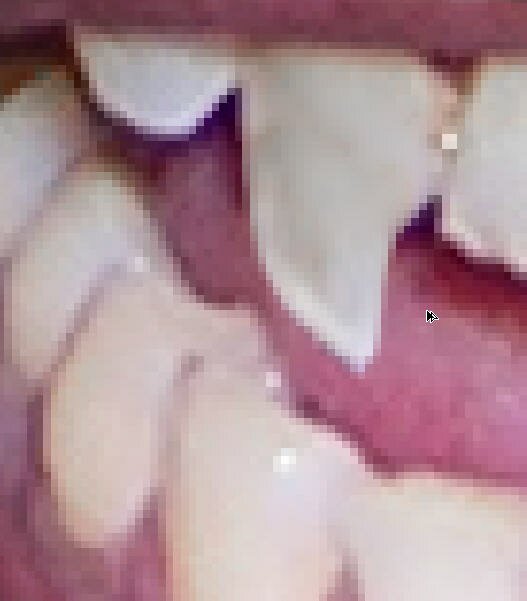
The fangs are quite easy to do. Hit ‘L’ for the lasso tool and select a tooth. CRTL+J to paste to a new layer, then CRTL+T to enter transform mode. Now all you need do is move, scale and rotate into position. Use the Eraser tool ‘E’ to get rid of any piece of tooth you don’t need, and then copy the layer, flip it and move it to the other side.
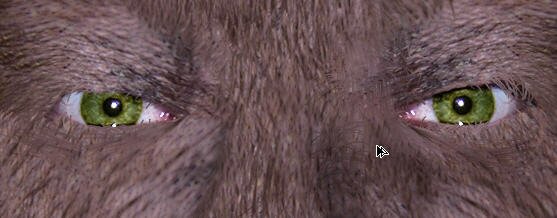
Step 23
The eyes. I haven’t actually seen a real live werewolf close up, so I’m not sure if their eyes change or not. I’m going to assume they change a little bit but keep some of their humanity. First, take the Colour Burn tool ‘O’ and set the options to ‘Midtones’ and Opacity to 15%. Paint around the eyes to darken them. While you are at it you can do the lips and tongue as well.
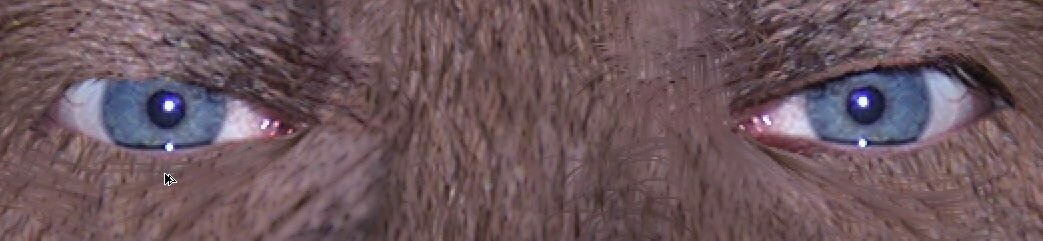
Step 24
Select the eyes with the quick mask tool and CRTL+J to paste to a new layer. Change the blend mode of the new layer to Overlay. Now hit CRTL+U to open up the Hue/Saturation window. You’ll see a little check box called ‘colorize’. Check it and change the colour.
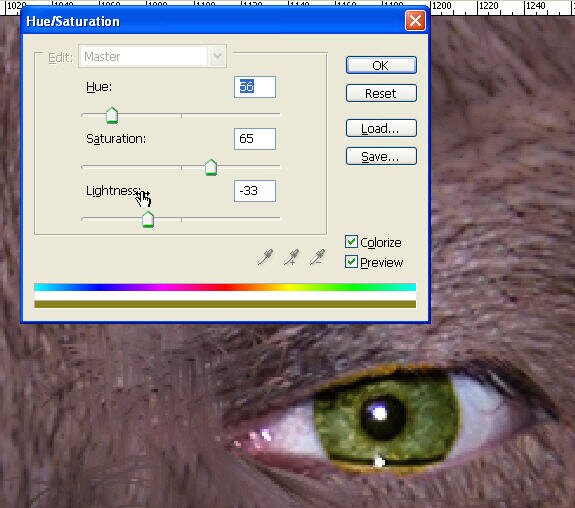
Step 25
Now just take the eraser tool and get rid that bit of yellow from the top and bottom of the eye.
Step 26
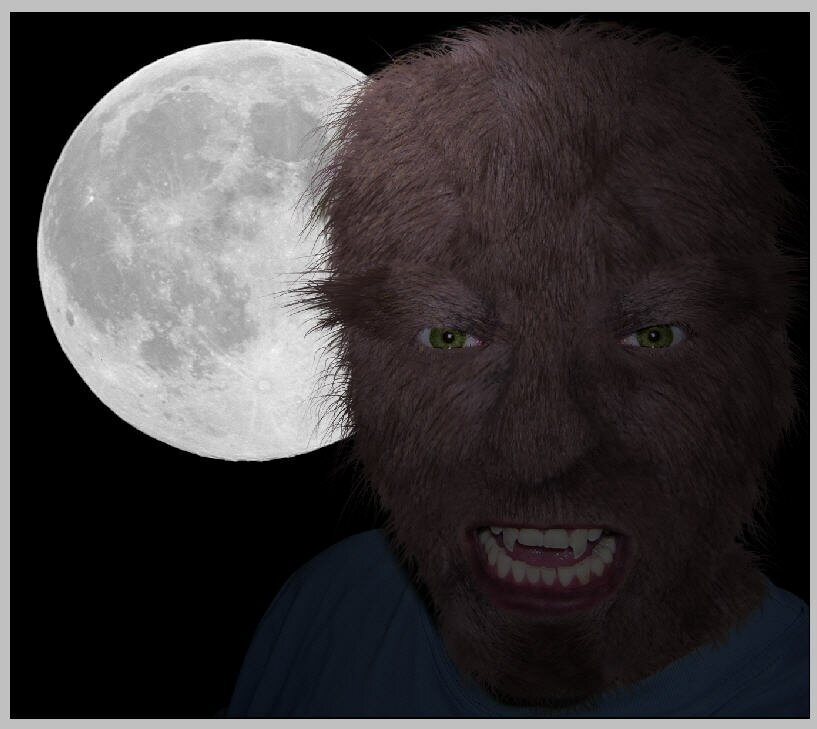
Google a picture of the moon (being careful that it isn’t copyright, of course). Bring it into Photoshop and place it under the head layer.
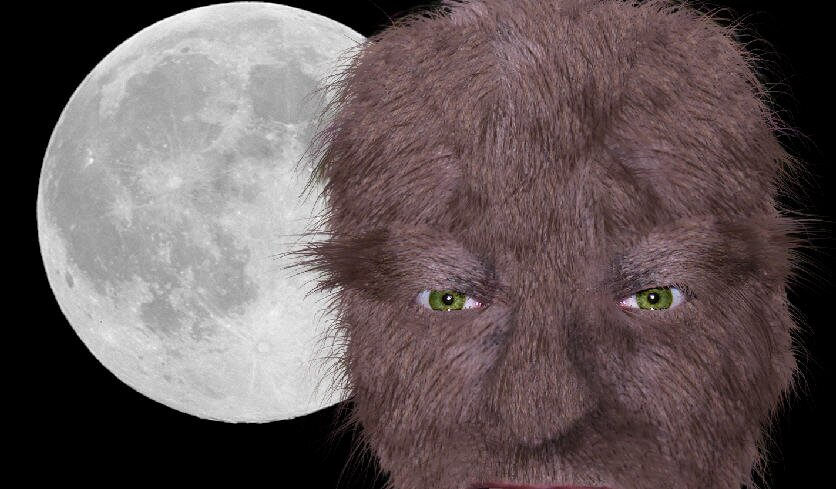
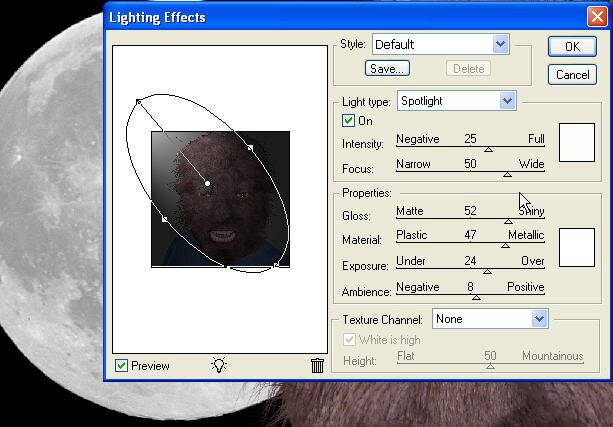
Step 27
Go Filter->Render-> Lighting effects. The light is coming from the moon, so we need to move the spotlight in the preview window to reflect that.
Step 28
Finally, use the Crop tool ‘C’ to get rid of the big board on the right and you’re done!